
Microsoft Outlook 2010 - Level 2
© Watsonia Publishing Page 65 Email Techniques
CHAPTER 7 EMAIL TECHNIQUES
Outlook provides many options and techniques that you can adopt
as you work with email messages.
In this session you will:
gain an understanding of some techniques you can use
to effectively manage email
learn how to recall a sent message
learn how to print a message
learn how to print a message list
gain an understanding of the various formats that can be
used for messages
learn how to change the message format for individual
messages
learn how to select a desired theme or stationery
learn how to apply a theme or stationery to single
messages
learn how to turn off the Outlook themes or stationery
feature
learn how to apply a theme to a new message
learn how to save a message as a draft
learn how to use a saved message
learn how to send a message with voting buttons
learn how to respond to a voting message
learn how to track voting responses
learn how to send automatic responses.
INFOCUS
WPL_O813
Microsoft Outlook 2010 - Level 2
© Watsonia Publishing Page 66 Email Techniques
EFFECTIVE EMAIL MANAGEMENT
As you become more and more familiar with
email you’ll understand why it is so popular.
Because of its widespread use you’ll probably
soon find yourself swamped with emails. As a
consequence of this, you’ll need to adopt some
sound techniques for managing the influx of
electronic mail. Below are some techniques for
managing your email more effectively.
Create A Hierarchy Of Folders And Name Them Sensibly
In many ways your Inbox is a little like your hard disk – and just like the files on your hard disk you
can create and name folders to help manage your emails more effectively. Personal folders can be
created below almost any folder in Outlook, however, the most logical place is under your Inbox.
You should create a logical sequence of folders and name them so that you can use them quickly to
locate an email that you may need to reference in the future. For example, if you purchase goods
online over the Internet most suppliers will send you an electronic receipt via email. It is a good idea
to place these email receipts in a special Receipts folder so that you can refer to them at any point
without having to search your entire Inbox.
Move Messages Out Of The Inbox
Once you’ve created a hierarchy of folders, get into the habit of moving messages that you wish to
retain out of the Inbox and into the relevant folder you’ve set up. Keeping the Inbox squeaky clean is
akin to working with a tidy desk.
This will help you to quickly see new incoming messages. Also, by moving the emails for
follow-up into more meaningful folders you are less likely to accidentally delete them while cleaning
up your Inbox.
If you regularly move emails to specific folders, the quickest method for performing this function is to
set up and use quick steps. Using a quick step, you can perform multiple tasks on the selected
message with just a single click.
Delete Email You Don’t Require Immediately
If you get an email and don’t need it, get rid of it. You can do this permanently and instantly by
selecting the message, holding down and pressing . If you think you don’t need a message,
delete it into the Deleted Items folder (you can do this by pressing or clicking on Delete ).
Since the Deleted Items folder is a temporary location at least if you do find you need a deleted
message later, you can recover it again.
Periodically, purge the Deleted Items folder to free up system resources and keep your email
manageable.
Use Contact Groups
If you email the same message to a number of people on a regular basis, set up contact groups in
Outlook Contacts. A contact group is simply a group of email addresses that you choose from
existing Contacts. Outlook then allows you to save this list as a single entry in Contacts. When you
need to send these people an email you simply click on the Group name rather than having to select
each address individually.
There are virtually no limits to the number of contact groups that you can have in Outlook and they
provide a great way to manage your outgoing email messages.
Utilise Conversation View
Conversation view groups all messages with the same subject and then displays only the latest
message in the message list. You can expand a conversation to see all messages as necessary. To
turn on Conversation view, tick Show as Conversation on the View tab.
In Conversation view, you can use Clean Up Conversation/Folder to delete all redundant
messages in a conversation – that is, all messages other than the most recent one except for
messages that have not been read, are flagged, are categorised, or include attachments.
You can also use Ignore Conversation to delete all messages in a conversation that is no longer
relevant, plus any future replies you may receive for the same conversation. If you change your mind
later, you can reverse the process.
Microsoft Outlook 2010 - Level 2
© Watsonia Publishing Page 67 Email Techniques
RECALLING A SENT MESSAGE
Try This Yourself:
Same
File
Continue using the
previous file with this
exercise...
Create a new message and
send it to a colleague
Click on Sent Items and
then double-click on your
message
Click on Actions in the
Move group and select
Recall This Message to
open the Recall This
Message dialog box
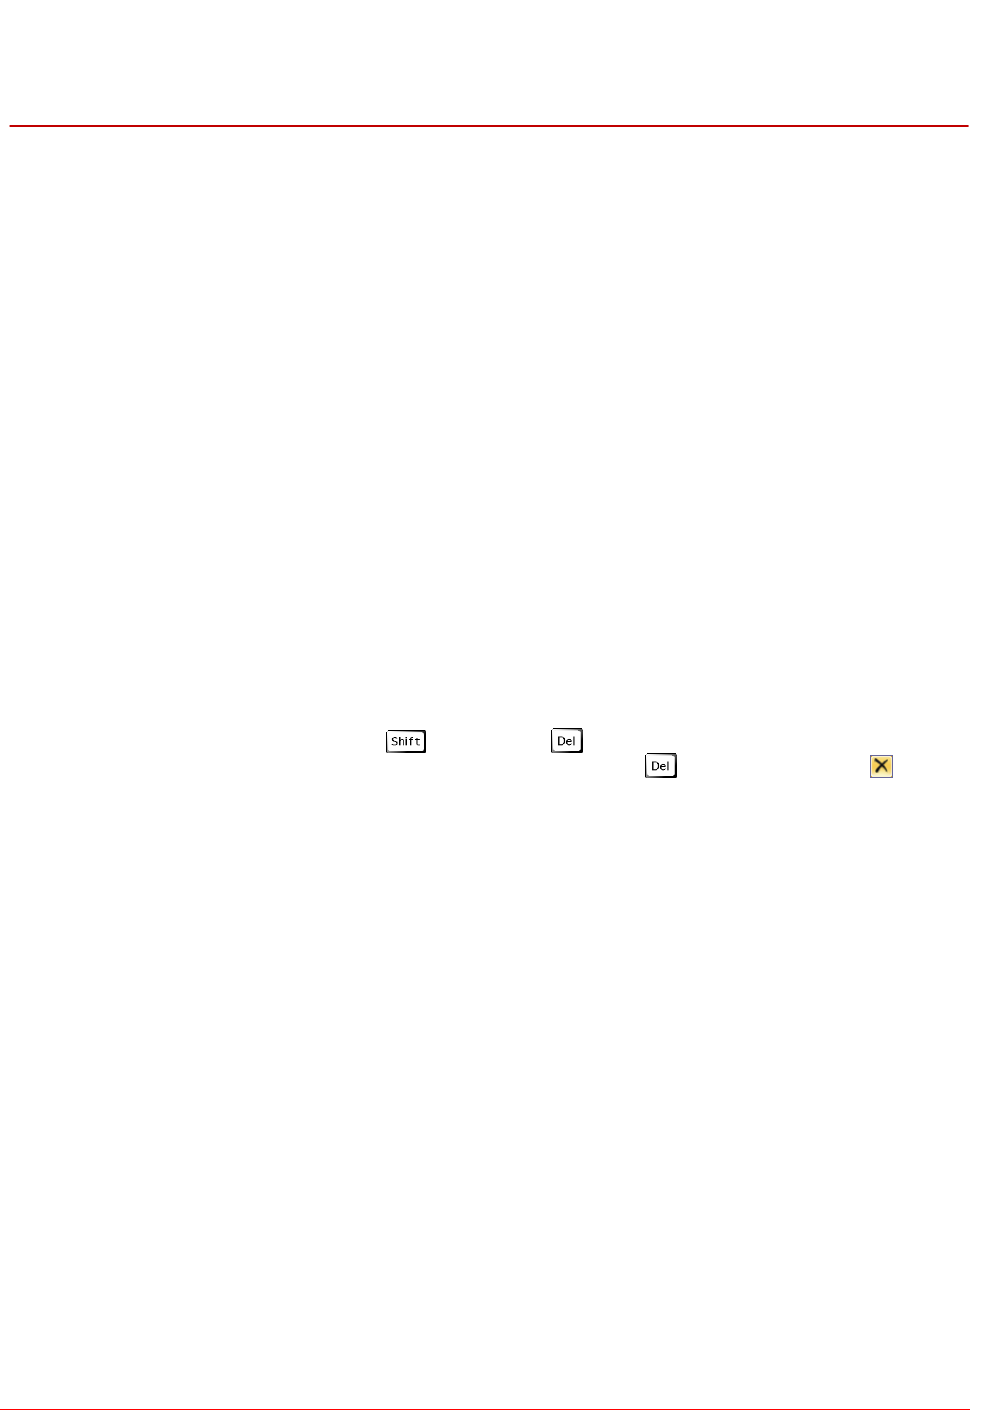
Ensure that Delete unread
copies of this message
and Tell me if recall
succeeds or fails for each
recipient are selected,
then click on [OK]
Close the message
If the recipient hasn’t
opened your message,
Outlook will delete it and
you will receive a Message
Recall Success notification.
If the recipient has opened
your message, the recall
will fail and you will receive
a Message Recall Failure
notification...
After a few minutes, click
on Inbox to see the
Message Recall
notification
For Your Reference…
To recall a sent message:
1. Double-click on the message in Sent Items
2. Click on Actions in the Move group and
select Recall This Message
3. Select the desired options
4. Click on [OK]
Handy to Know…
Most home and personal accounts do not
use Microsoft Exchange. So for example, if
you have sent an email to someone's
personal internet service provider (ISP)
POP3 email account, you will not be able to
recall the sent email message.
3
4
Imagine sending a message and realising that
some of the information is wrong or that you
forgot to attach the file that you’ve referred to in
the message. If both you and the recipient of your
message use Microsoft Exchange Server, you can
recall the message. Exactly how successful the
recall will be will depend on whether or not the
recipient has opened the message.
6
Microsoft Outlook 2010 - Level 2
© Watsonia Publishing Page 68 Email Techniques
PRINTING A MESSAGE
Try This Yourself:
Same
File
Continue using the
previous file with this
exercise, or open the file
Watsonia_11.pst...
Click on the Amanda
Bennett message with
the RE: Paris Trade
Show subject
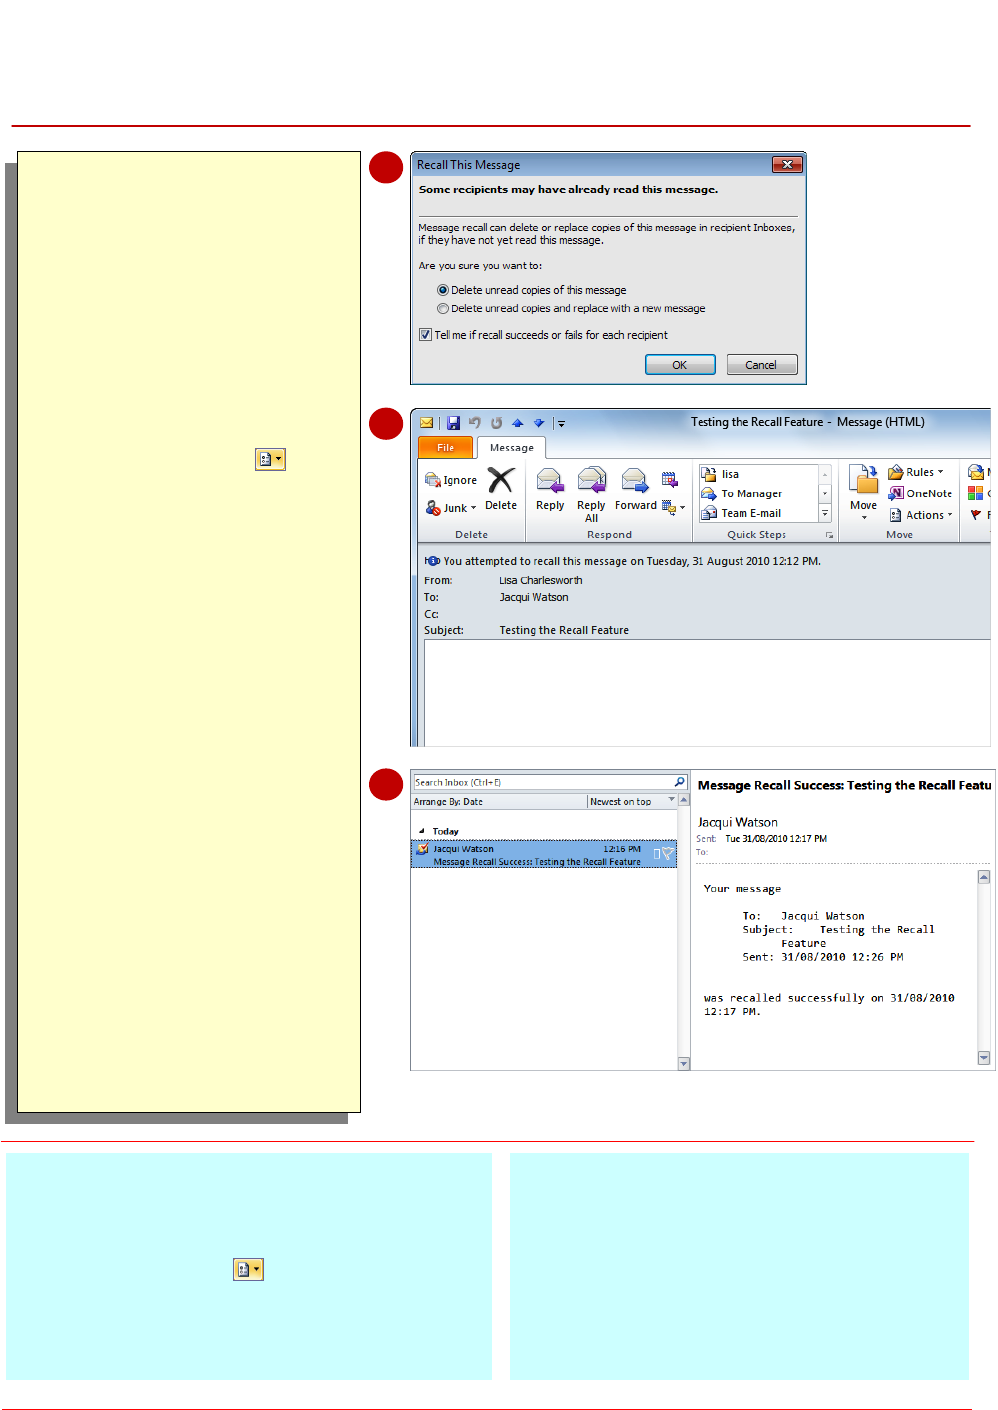
Click on the File tab and
click on Print to display
the print settings
Select the desired
Printer and ensure that
Memo Style is selected
under Settings
Notice that the message
will print in a style
similar to a memo...
Click on [Print] to print
the message or press
to return to the
Inbox
For Your Reference…
To print a message from a message list or an open
message:
1. Click on the File tab
2. Click on Print
3. Select Memo Style in Settings
4. Click on [Print]
Handy to Know…
You can print the attachments in your
message by clicking on [Print Options] in
the Backstage to open the Print dialog box
and then ticking Print attached files.
You can click on [Define Styles] in the Print
dialog box to edit or create new Print styles.
2
3
Even though the whole idea of electronic mail
messaging is to avoid or at best minimise paper
usage, there will be times when you want or need
to print an email message. You can print a
message from any of the Mail folders or directly
from an open message using the Backstage. You
can also preview the message in the Backstage
before printing it.
Microsoft Outlook 2010 - Level 2
© Watsonia Publishing Page 69 Email Techniques
PRINTING A MESSAGE LIST
Try This Yourself:
Same
File
Continue using the
previous file with this
exercise, or open the file
Watsonia_11.pst...
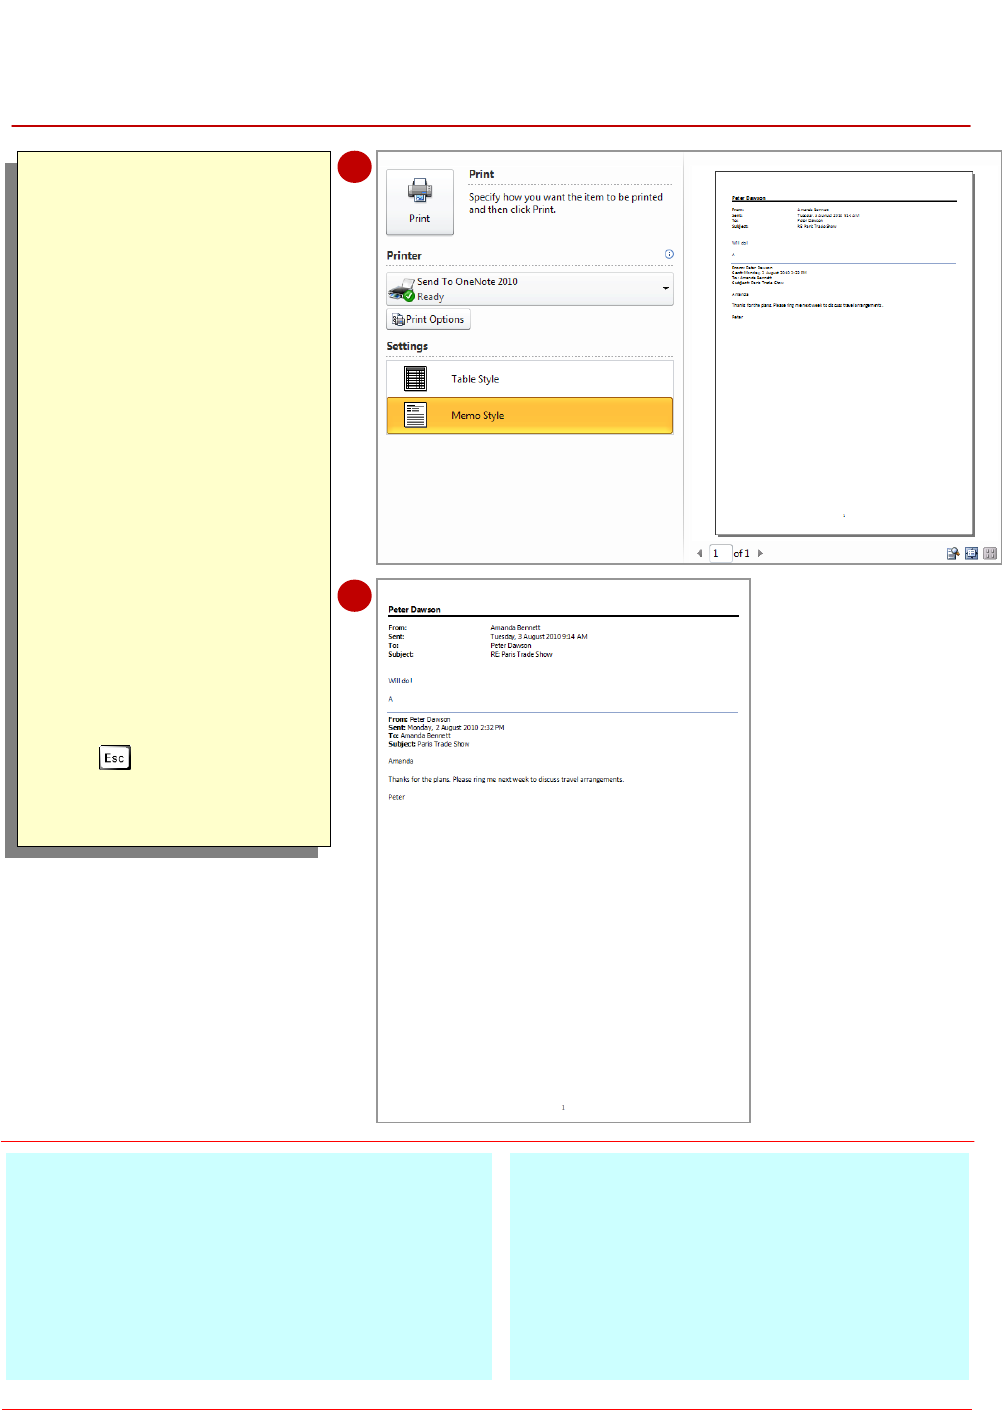
Click on Inbox to ensure
that it is currently
displayed
Let’s print a list of all
messages in the message
list.
If you wanted to print
specific messages, you
could search for them by
clicking in Instant Search
and typing the desired
criteria…
Click on the File tab and
click on Print to display
the print settings
Click on Table Style
under Settings
The preview shows that
all of the messages
included in the message
list will be printed…
Click on [Print] to print
the message list or press
to return to the Inbox
For Your Reference…
To print a message list:
1. Click on the Mail folder
2. Sort and lay out the folder as desired
3. Click on the File tab, then click on Print
4. Select Table Style in Print style
5. Click on [Print]
Handy to Know…
You can print a list of selected messages in
the current folder. To do this select the
desired messages, click on the File tab, click
on Print and select Table Style under
Settings. Click on [Print Options], select
Only selected rows under Print range and
then click on [OK]. Click on [Print].
3
There may be times when you want a hard copy
of the messages listed in one of your Mail folders
or perhaps you might want to print a list of all
messages that you’ve received from a particular
sender. To achieve this, you can either perform a
search to display only the required messages in the
message list or select the specific messages in the
message list before accessing the Backstage.

Microsoft Outlook 2010 - Level 2
© Watsonia Publishing Page 70 Email Techniques
MESSAGE FORMATS
Not all email applications are alike so you need to
use a message format that your recipient's
application supports. Outlook supports three
formats. The format you choose will determine
what your message can contain − bold fonts or
being able to add pictures in the message body etc.
If a recipient’s mail application supports the format,
they will see the message just as you created it.
HTML (Hypertext Markup Language)
HTML is the default message format used by Outlook. It is also the best format to use when you
want to create messages that are similar to documents that you can produce in Microsoft Word. For
example, you can include various fonts, colours, bullet lists and tables using HTML format.
By default, when you select either HTML or RTF (both of these options allow you to format message
text), the message will be sent in HTML format. Thus, at least when you use HTML, you know that
what you send is what the recipient will see – as long as their mail application supports HTML.
Plain Text
The Plain Text format is supported by all email applications. Plain text doesn't support features such
as bold, italic, colours, fonts, or other text formatting. It also doesn't support pictures that are
displayed directly in the message body, although you can include pictures as attachments.
If you have security concerns about reading HTML-formatted messages, you can set Outlook to
open all messages in plain text format. (To do this, select File > Options > Trust Centre > Trust
Centre Settings > E-mail Security and tick Read all standard mail in plain text under Read as
Plain Text.) Be aware, however, that reading messages in plain text does not provide full protection
against all email hazards.
Outlook Rich Text Format (RTF)
Outlook RTF is a Microsoft format that only the following email applications support:
Microsoft Exchange Client versions 4.0 and 5.0
Microsoft Outlook 2010
Microsoft Office Outlook 2003 and 2007
Microsoft Outlook 97, 98, 2000 and 2002
You can use RTF when sending messages within an organisation that uses Microsoft Exchange
Server; however, it is still recommended that you use HTML format.
RTF supports text formatting, including bullets, alignment and linked objects. By default, Outlook
automatically converts RTF-formatted messages to HTML when you send them to an internet
recipient so that the message formatting is maintained and attachments will be received. Outlook
also automatically formats meeting and task requests and messages with voting buttons so that
these items can be sent intact across the internet to other Outlook users, regardless of the default
format of the message. If an internet-bound message is a task or meeting request, Outlook will
automatically convert it to internet Calendar format, a common format for internet calendar items, so
that other email applications can support it.
Microsoft Outlook 2010 - Level 2
© Watsonia Publishing Page 71 Email Techniques
CHANGING THE MESSAGE FORMAT
Try This Yourself:
Same
File
Continue using the
previous file with this
exercise, or open the file
Watsonia_11.pst...
Create a new message and
send it to yourself
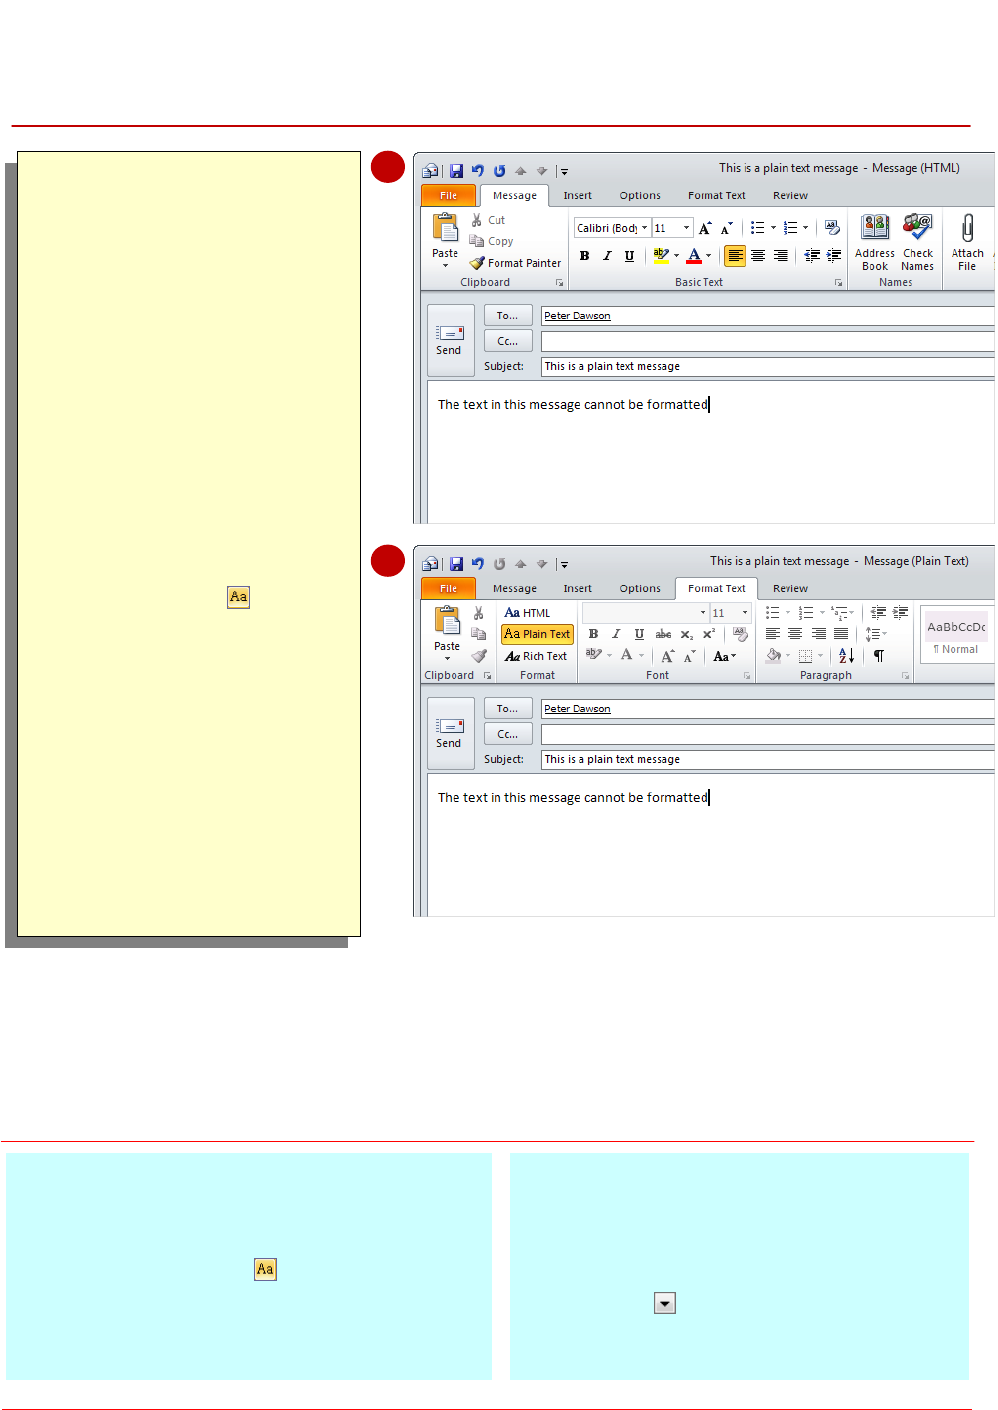
Type This is a plain text
message in Subject and
then type The text in this
message cannot be
formatted in the body of
the message
Click on the Format Text
tab in the ribbon, then click
on Plain Text in the
Format group
Notice that the tools in the
Font, Paragraph and Styles
groups are greyed out,
indicating that they’re not
available. The tools in the
Themes group of the
Options tab are also
unavailable...
Send the message
For Your Reference…
To change the format for a single message:
1. Create a new message
2. Click on Plain Text in the Format group
on the Format Text tab
3. Enter the text
4. Send the message
Handy to Know…
You can change the message format for all
messages in the Backstage. Click on the
File tab, click on Options, and then click on
Mail to display the mail options. Click on the
drop arrow for Compose messages in
this format under Compose messages,
select the desired format and click on [OK].
2
3
HTML is the default message format used to
create messages in Outlook. But you don’t have
to use HTML message format. For example, if
you want to create a new message for a recipient
who uses a very basic internet mail application,
creating the message using plain text format would
be more appropriate than the default HTML format.
Microsoft Outlook 2010 - Level 2
© Watsonia Publishing Page 72 Email Techniques
CHOOSING THEMES OR STATIONERY
Try This Yourself:
Same
File
Continue using the
previous file with this
exercise, or open the file
Watsonia_11.pst...
Click on the File tab, click
on [Options], and then
click on Mail to display the
mail options
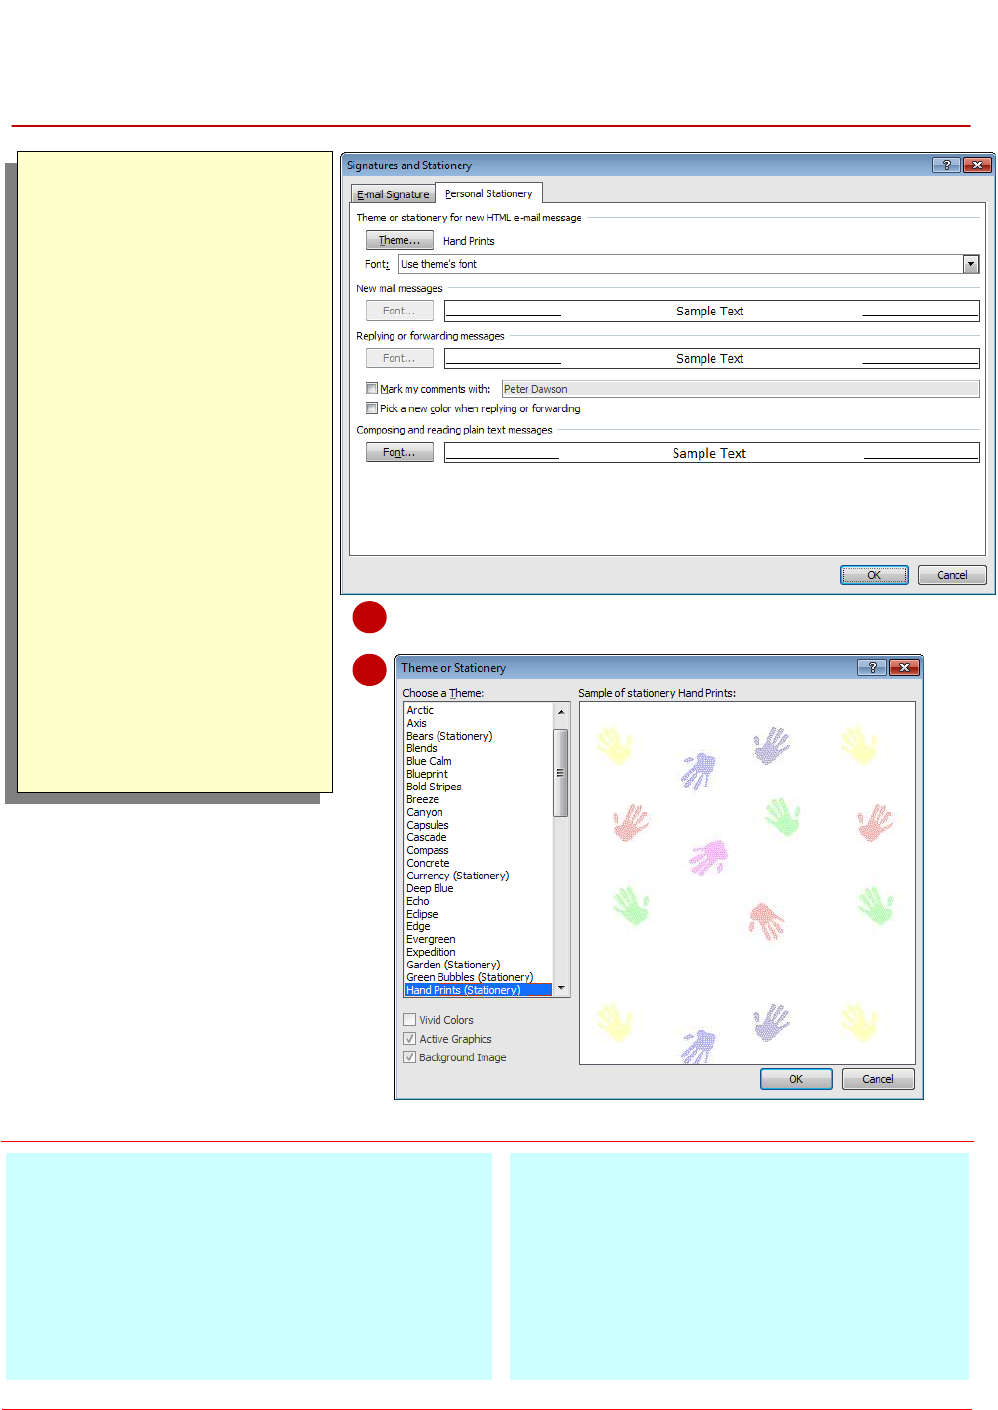
Click on [Stationery and
Fonts] to open the
Signatures and
Stationery dialog box, then
click on [Theme] to open
the Theme or Stationery
dialog box
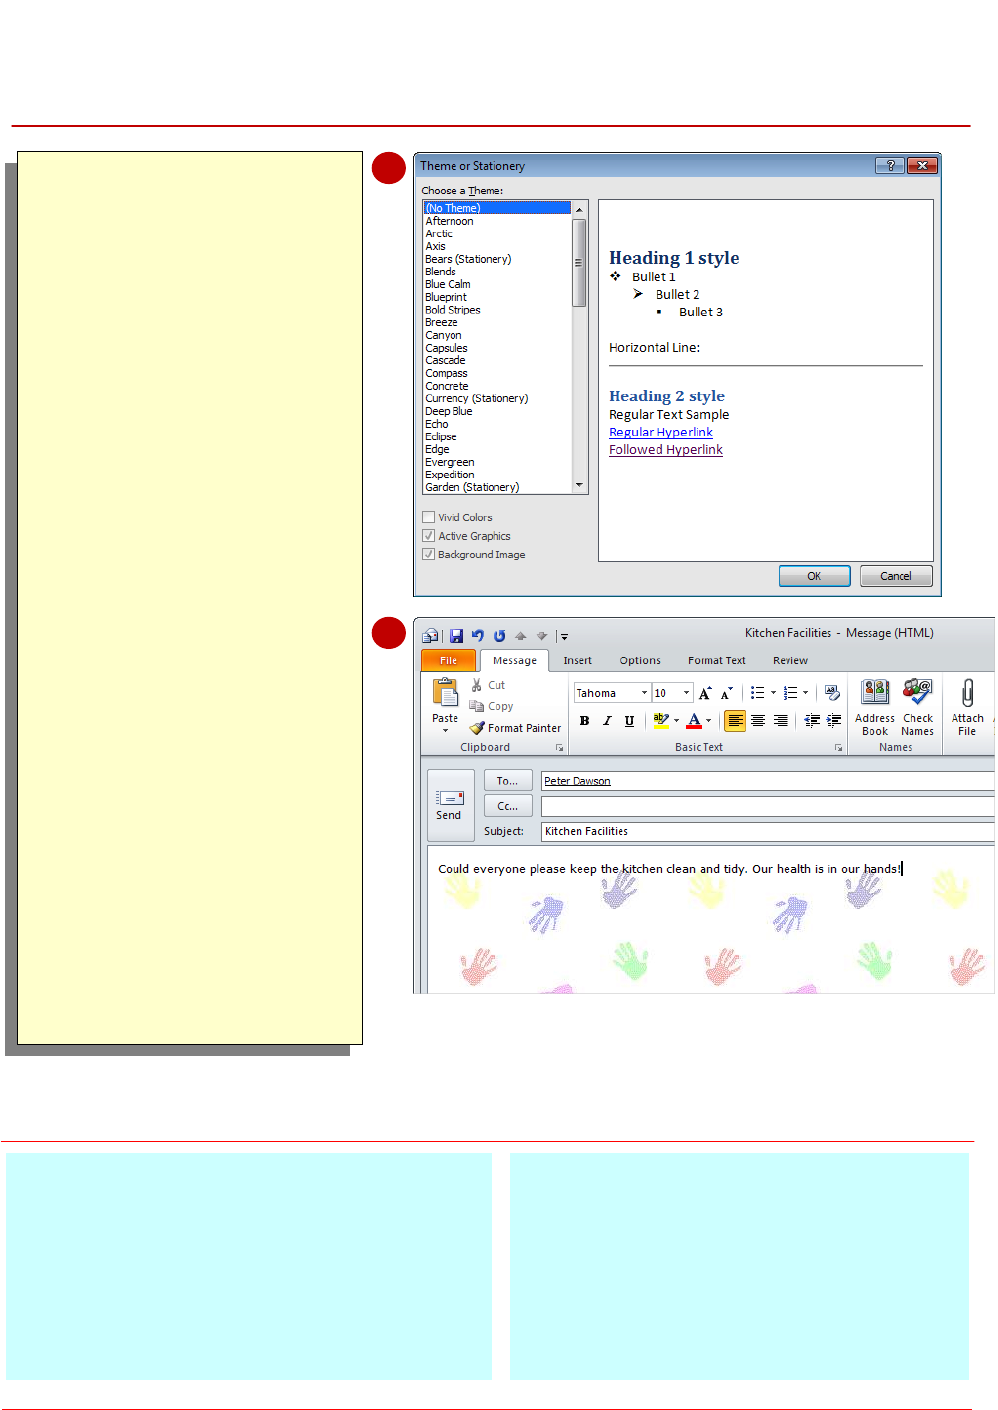
Click on the various theme
and stationery options and
watch how the preview
changes
Click on Hand Prints
(Stationery), then click on
[OK] three times to return
to the Inbox
Create a new message,
address it to yourself and
type Could everyone
please keep the kitchen
clean and tidy. Our health
is in our hands!
Send the message
For Your Reference…
To choose a stationery/theme for all messages:
1. Click on the File tab, click on [Options] then
click on Mail
2. Click on [Stationery and Fonts], then click
on [Theme]
3. Select the desired option
4. Click on [OK] three times
Handy to Know…
The format and styles used in some
stationery and theme options can be a little
overwhelming. Choose subtle options, such
as ones with a picture or image down the
side, or ones with a very subdued
background pattern, rather than very busy or
overstated designs.
2
5
Outlook lets you compose new messages with
special backgrounds known as stationery. This
is similar to writing messages on letterhead or
special note paper. Themes are a collection of
design elements, including background effects,
fonts, text and graphics that provide a theme to
your message. For example, the winter theme will
give the impression of coldness to your messages.
Microsoft Outlook 2010 - Level 2
© Watsonia Publishing Page 73 Email Techniques
APPLYING A THEME OR STATIONERY TO A MESSAGE
Try This Yourself:
Same
File
Continue using the
previous file with this
exercise, or open the file
Watsonia_11.pst...
Click on New Items in
the New group and then
select E-mail Message
Using > More Stationery
to open the Theme or
Stationery dialog box
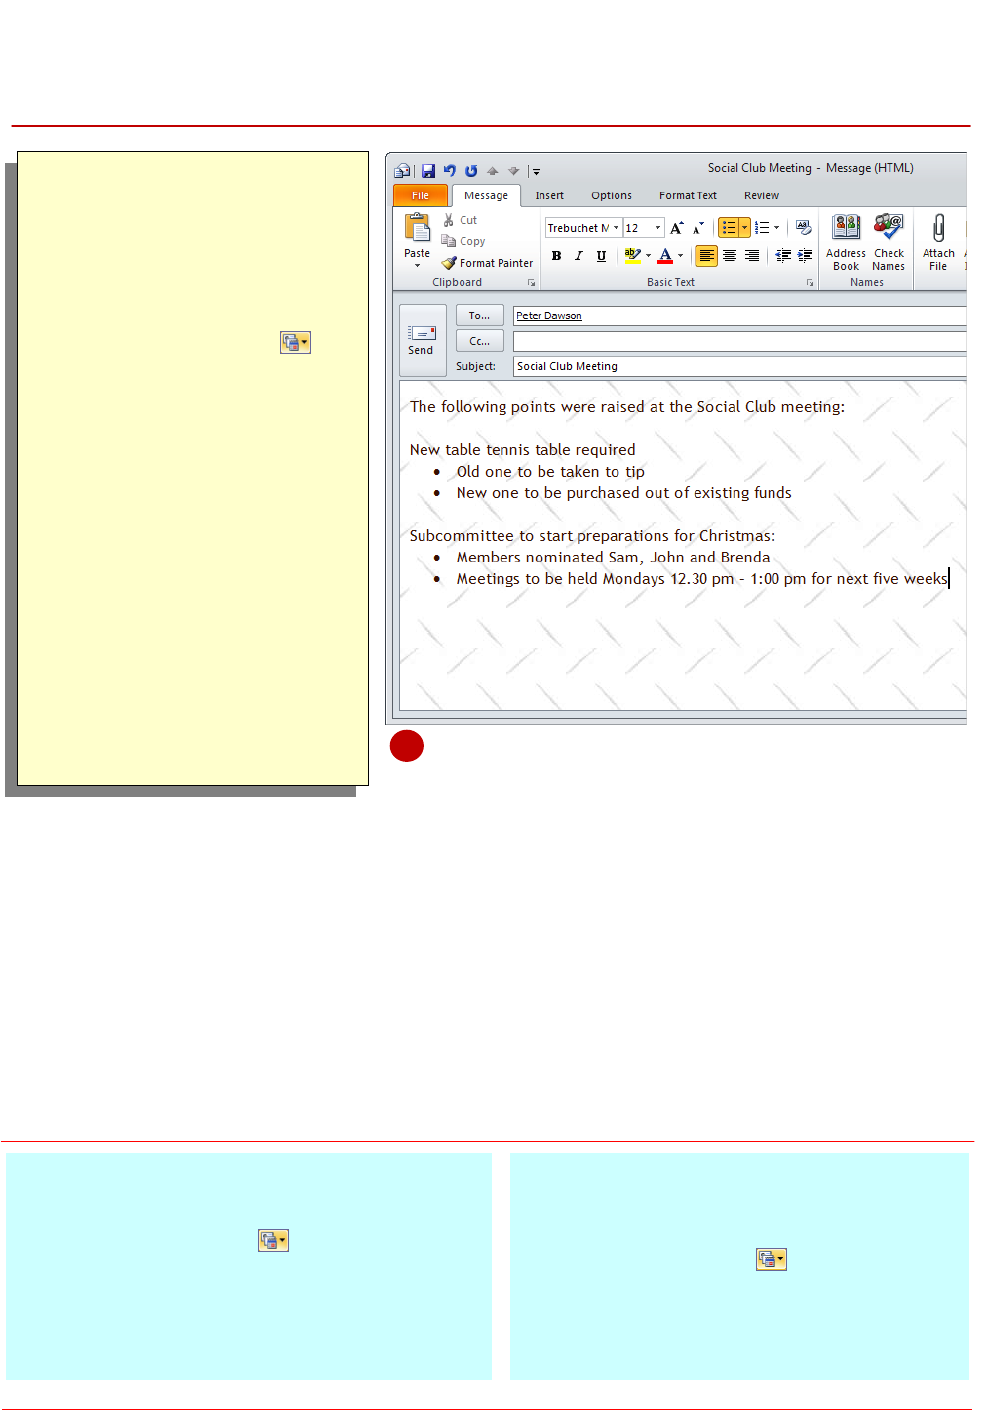
Scroll down to and click on
Industrial and then click on
[OK] to open a new
message with the theme
applied
Address the message to
yourself, and then type a
subject and message
Send the message
For Your Reference…
To apply a theme/stationery to a single message:
1. Click on New Items and select New
E-mail Message Using > More Stationery
2. Select the desired theme or stationery
3. Click on [OK]
4. Compose and send the message
Handy to Know…
Once you have used a particular theme or
stationery option in a new message by
clicking on New Items and then selecting
New E-mail Message Using > More
Stationery, the theme or stationery option
will appear at the top of the New
E-mail Message Using submenu.
3
As you create a new message, you can choose
to apply a particular theme or stationery option
to it. This gives you the flexibility to pick a design
that best suits the proposed contents of your
email message. Be careful not to overuse this
feature – your recipients may become
overwhelmed!
Microsoft Outlook 2010 - Level 2
© Watsonia Publishing Page 74 Email Techniques
TURNING THEMES OR STATIONERY OFF
Try This Yourself:
Same
File
Continue using the
previous file with this
exercise, or open the file
Watsonia_11.pst...
Click on the File tab,
click on [Options], and
then click on Mail to
display the mail options
Click on [Stationery
and Fonts] to open the
Signatures and
Stationery dialog box
Click on [Theme] to
open the Theme or
Stationery dialog box
Click on (No Theme)
under Choose a
Theme, then click on
[OK] three times to
return to the Inbox
For Your Reference…
To turn off themes or stationery:
1. Click on the File tab, click on [Options], and
then click on Mail
2. Click on [Stationery and Fonts]
3. Click on [Theme] and select (No Theme)
4. Click on [OK] three times
Handy to Know…
If you don’t want to receive messages with a
theme or stationery applied, you can choose
to display all open messages in plain text.
This will also remove all formatting from the
message. To do this, select File > Options >
Trust Centre > Trust Centre Settings >
E-mail Security.
2
3
If you have selected to use a particular theme or
stationery option for all messages, you can
quickly turn off this feature if desired. Perhaps
you may be tired of the look and feel of your
messages and simply want to revert to the plain
and simple default look. By selecting the default no
theme option, you can always choose to apply a
theme or stationery to specific messages only.
Microsoft Outlook 2010 - Level 2
© Watsonia Publishing Page 75 Email Techniques
APPLYING A THEME
Try This Yourself:
Continue using the previous
file with this exercise...
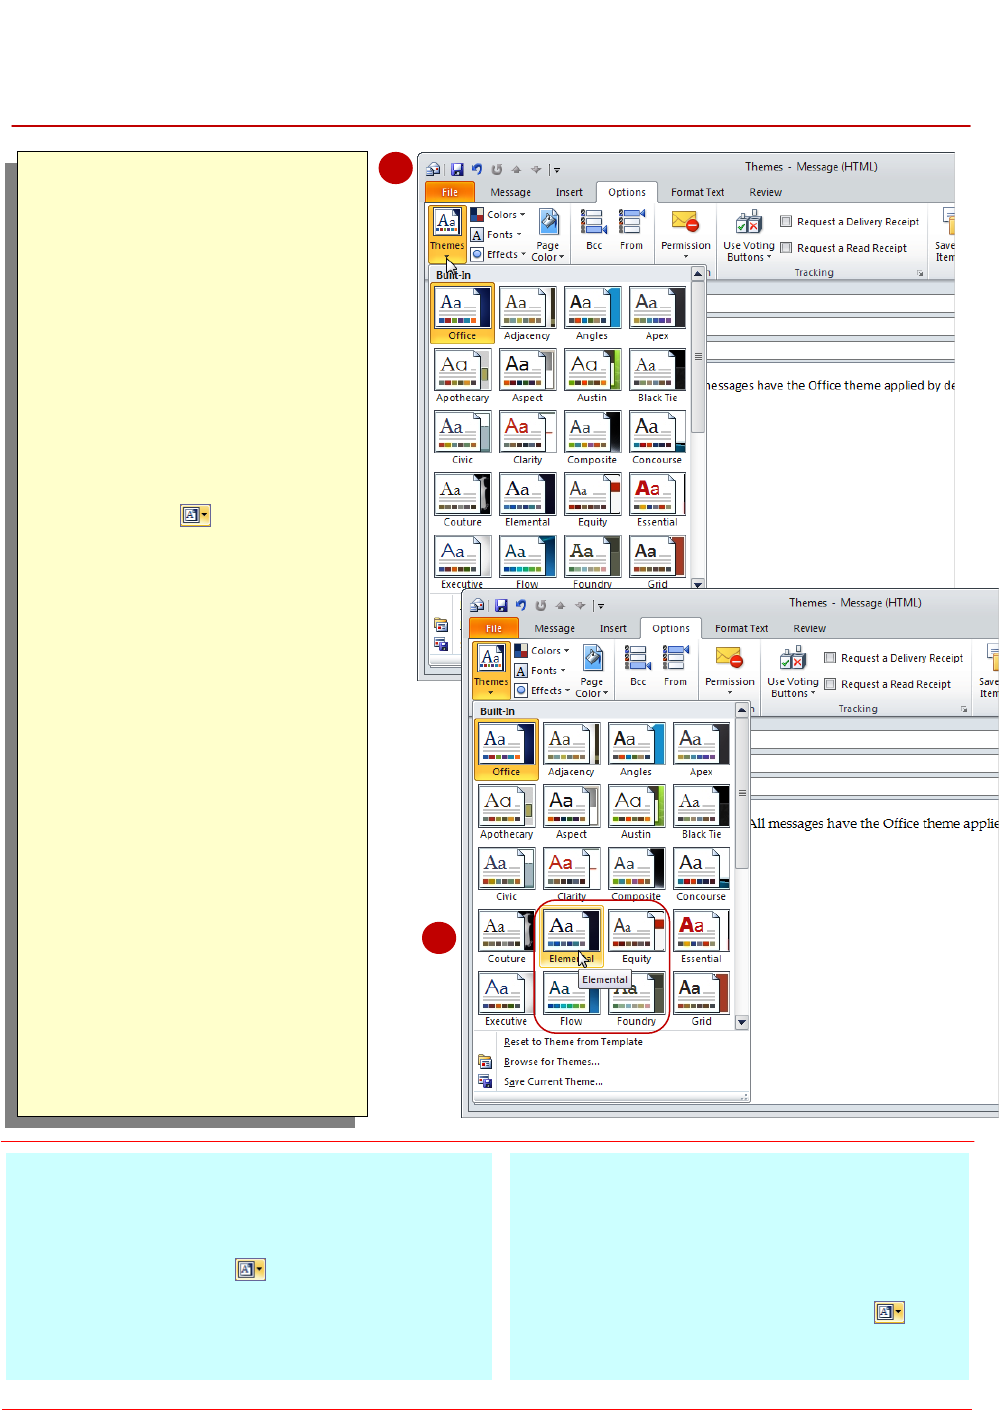
Create a new message,
address it to yourself, and
type This message is
looking at different
themes. All messages
have the Office theme
applied by default.
Click on the Options tab on
the ribbon, then click on
Themes in the Themes
group to open the Themes
gallery
The default Office theme is
currently applied to this
message – notice that it is
highlighted in orange. Look
at the message and take
note of the fonts and colours
used with this theme...
Point to the various themes
in the gallery to see them
applied temporarily to the
message in Live Preview
The Elemental theme has
been applied temporarily in
this example. Notice that the
fonts used in the text and
the size and colour of the
fonts vary with the different
themes...
Select the desired theme,
and then send the message
For Your Reference…
To apply a theme to a message:
1. Create the message
2. Click on Themes in the Themes group
on the Options tab
3. Click on the desired theme
4. Send the message
Handy to Know…
You can only apply a theme to a message
that has been created using the default
HTML message format.
You can see which theme is applied to a
message by hovering over Themes . The
theme name will appear in the tooltip.
2
3
A theme is a set of unified design elements and
colour schemes that you can use to create
professional-looking messages. When you apply
a theme to a message, Outlook customises the
background colours and graphics, body and
heading styles, lists, horizontal lines, hyperlink
colours and table border colours.
Microsoft Outlook 2010 - Level 2
© Watsonia Publishing Page 76 Email Techniques
SAVING A MESSAGE DRAFT
Try This Yourself:
Same
File
Continue using the
previous file with this
exercise, or open the file
Watsonia_11.pst...
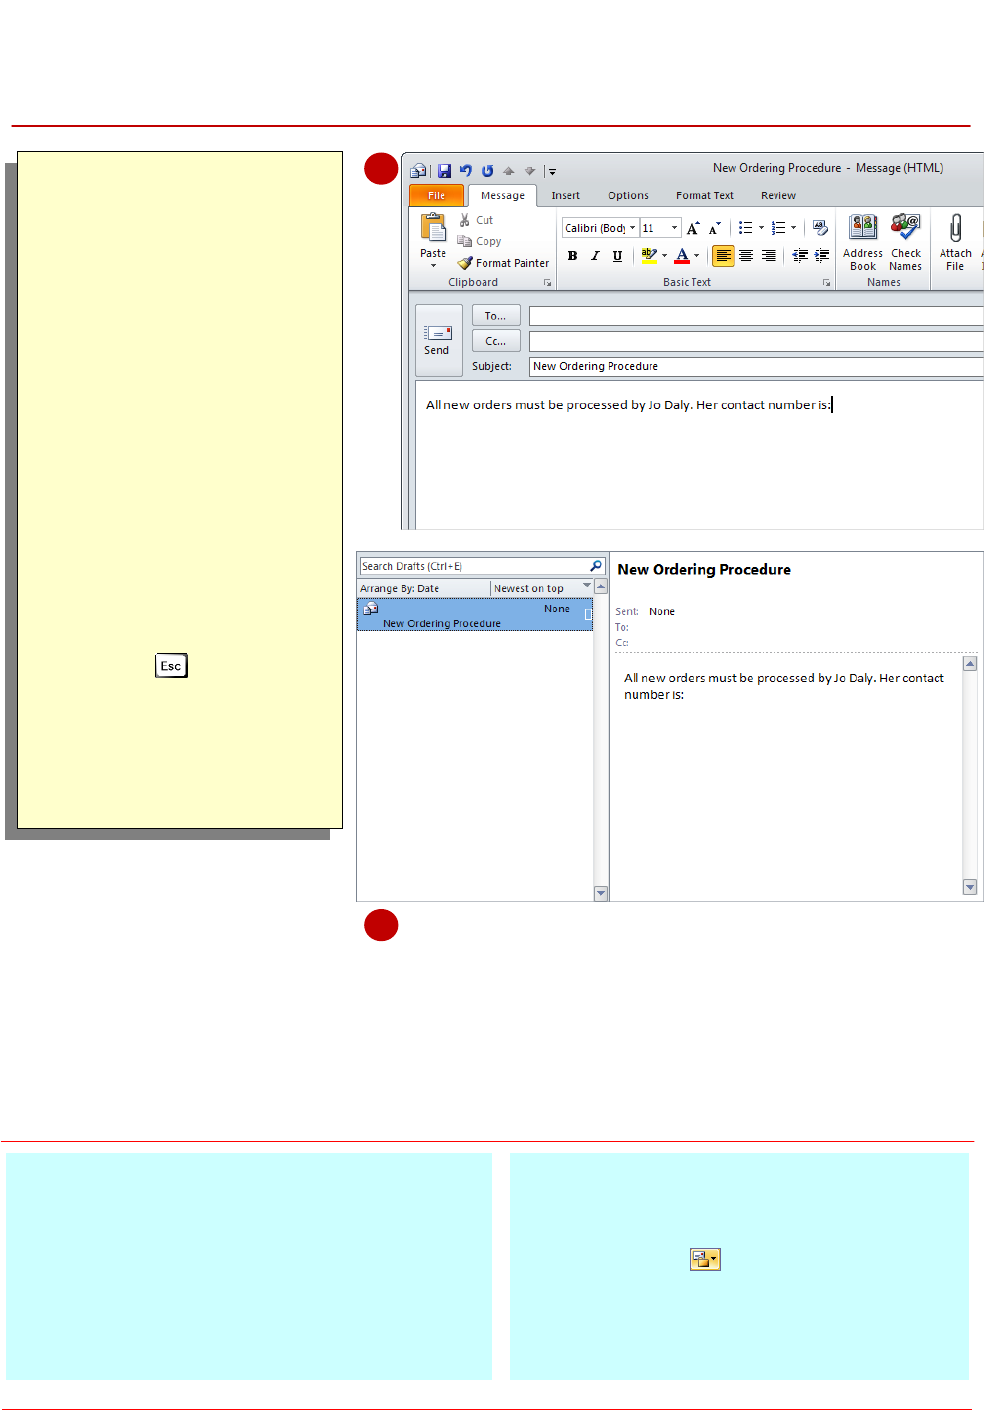
Create a new mail
message and type New
Ordering Procedure in
Subject
Type the following text in
the body of the message
All new orders must be
processed by Jo Daly.
Her contact number is:
Click on the File tab and
click on [Save] to save
the message
Press to close the
message, then click on
Drafts to see that the
message has been saved
in this folder
For Your Reference…
To save a message as a draft:
1. Compose the message
2. Click on the File tab and click on [Save]
Handy to Know…
You can save a message in a folder other
than the Drafts folder by clicking on Save
Sent Items To in the More Options
group on the Options tab and selecting
Other Folder.
You can save a copy of a message to disk by
clicking on File and selecting Save As.
2
3
Sometimes it can take time to create an email
message. Perhaps you are struggling for just the
right words or you are waiting for additional
information from another source – whatever the
case, if you do not wish to complete and send an
email message you can save it as a draft. Saved
messages are placed in the Drafts folder from
which they can be opened and worked upon later.
Microsoft Outlook 2010 - Level 2
© Watsonia Publishing Page 77 Email Techniques
USING A SAVED MESSAGE
Try This Yourself:
Same
File
Continue using the
previous file with this
exercise, or open the file
Watsonia_11.pst...
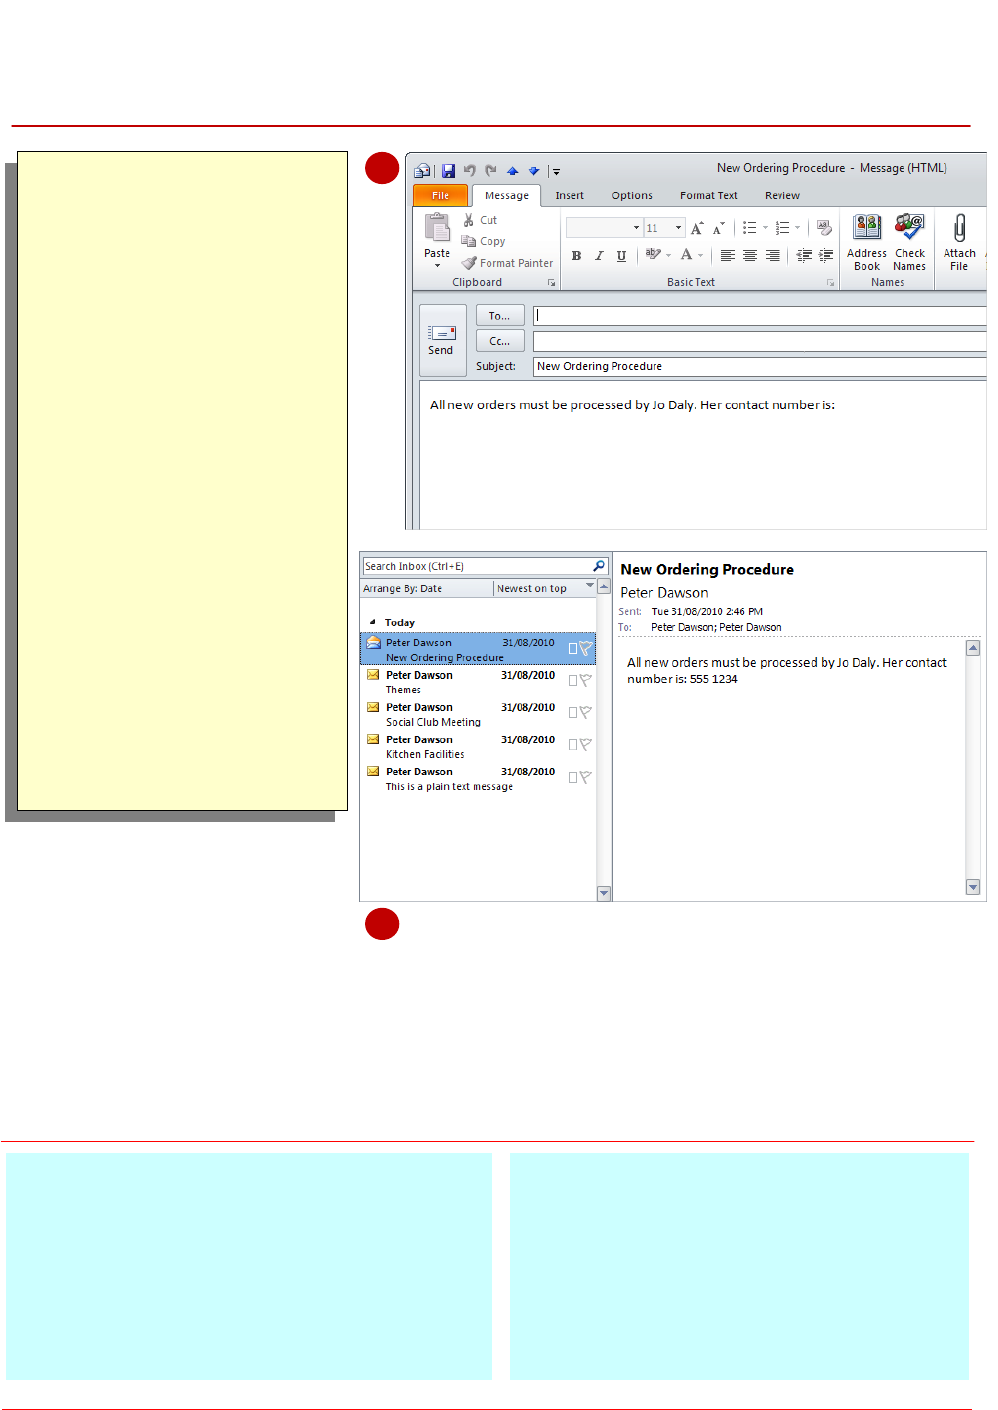
Ensure that the Drafts
folder is open
The New Ordering
Procedure message
should be listed…
Double-click on the New
Ordering Procedure
message to open it in a
message window
Complete the message by
addressing it to yourself
and typing 555 1234 to
the right of the colon (:),
then send the message
Click on the Inbox to
check that your new
message has arrived
For Your Reference…
To use a saved message:
1. Click on Drafts
2. Double-click on the saved message
3. Complete and send the message
Handy to Know…
You can save the message as often as you
like. If you have no need to retain a saved
message you can delete it from the Drafts
folder.
2
4
Messages that have been saved in the Drafts
folder can be opened so that you can continue
working on them. Draft messages are opened in
the same way as opening any other messages −
typically this is done by double-clicking on the
message.
Microsoft Outlook 2010 - Level 2
© Watsonia Publishing Page 78 Email Techniques
SENDING A VOTING MESSAGE
Try This Yourself:
Same
File
Continue using the
previous file with this
exercise, or open the file
Watsonia_11.pst...
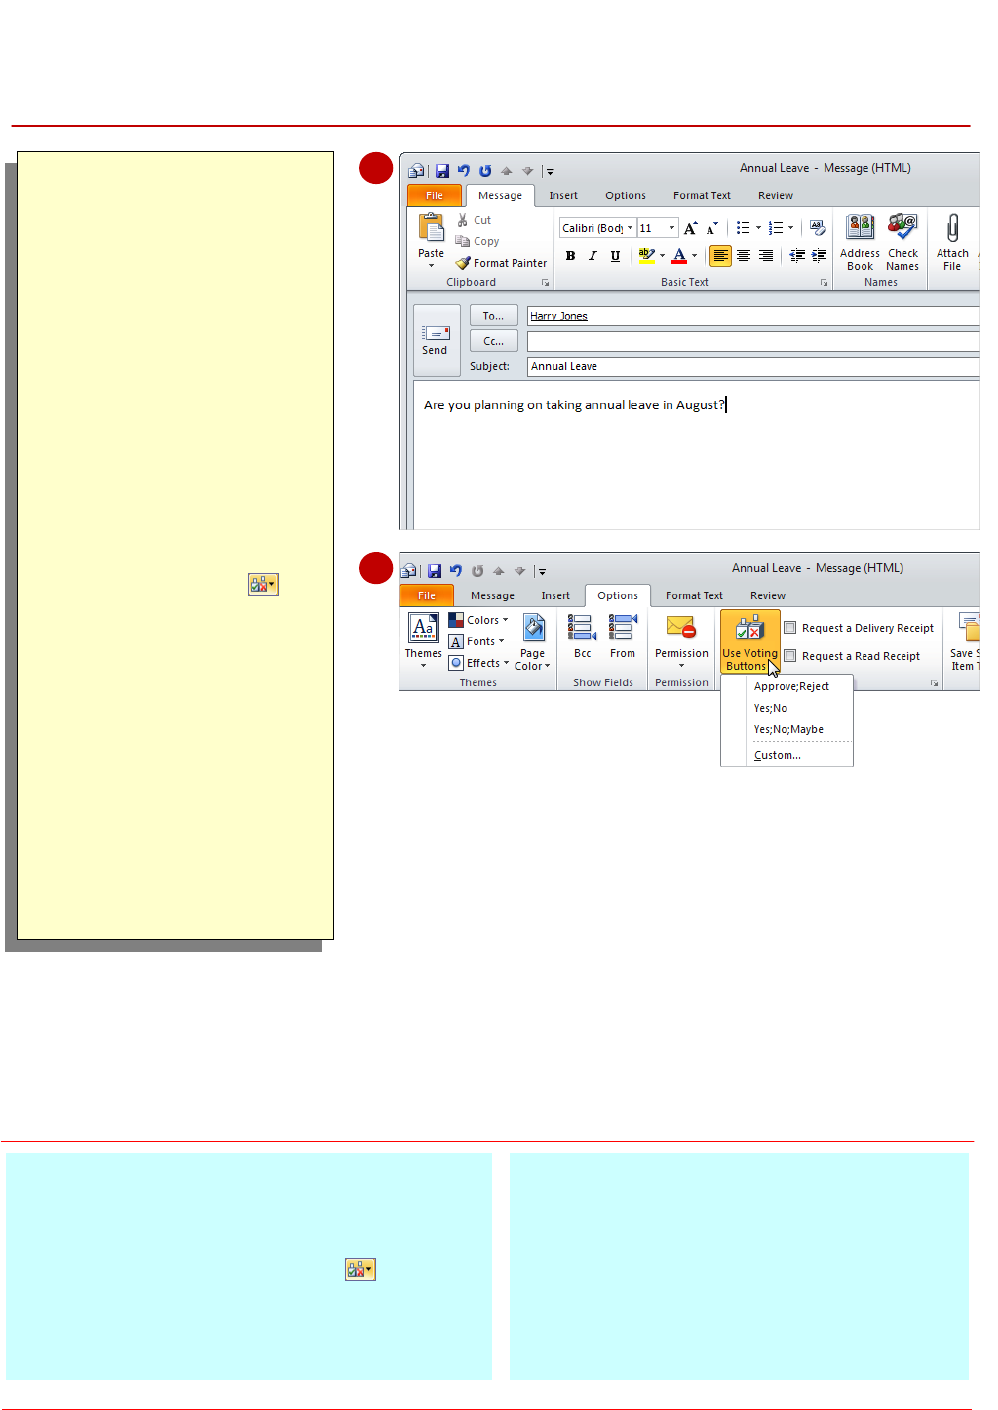
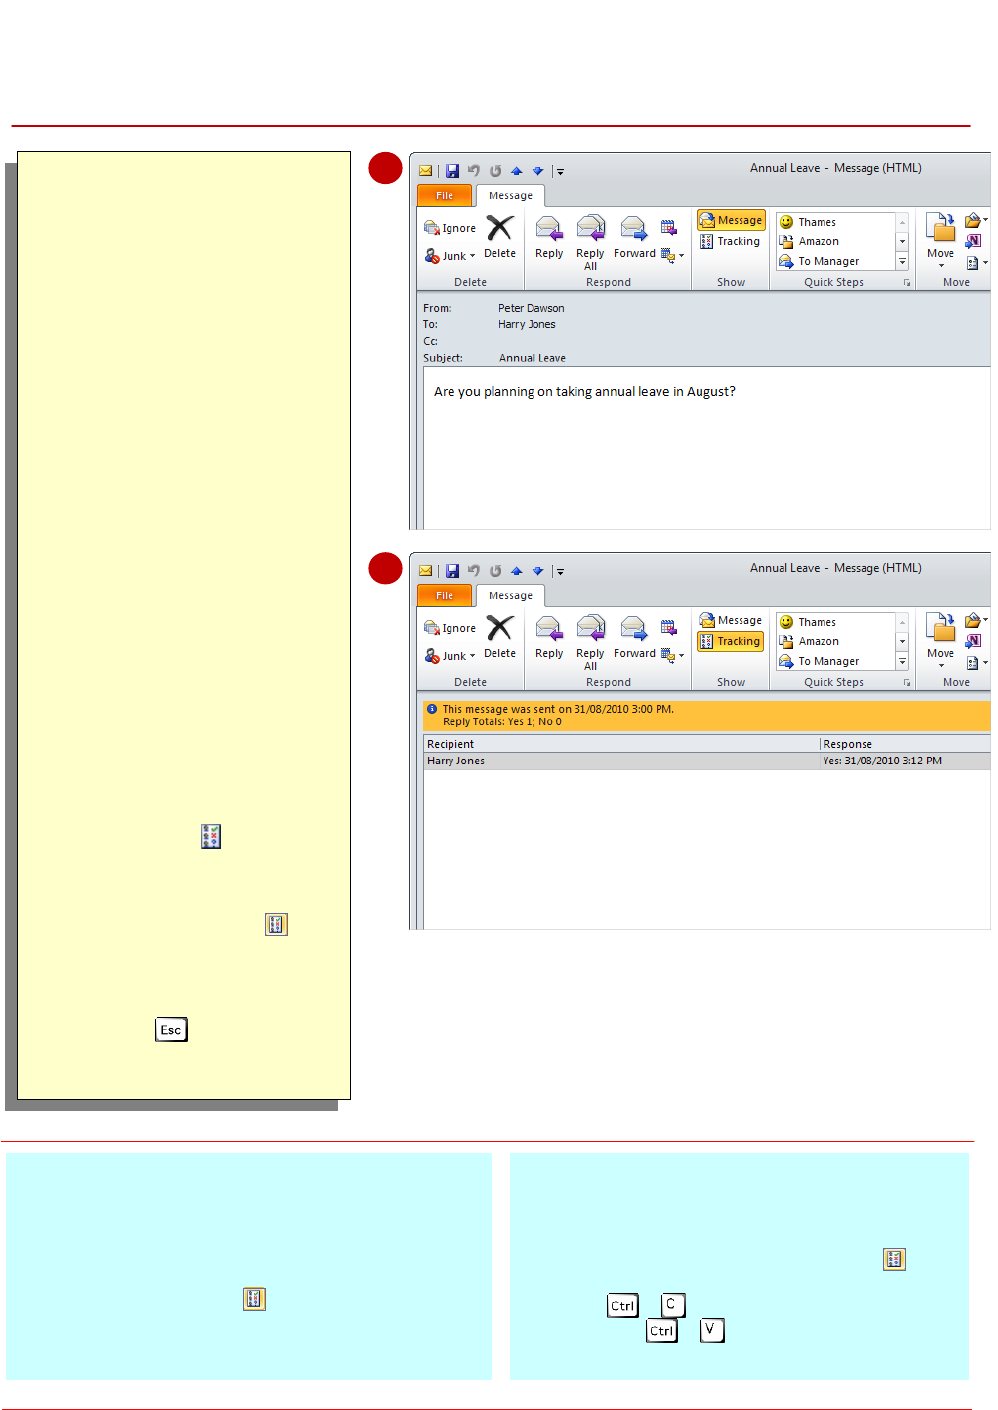
Create a new message,
address it to a
colleague, type Annual
Leave in Subject, and
type Are you planning
on taking annual leave
in August? in the
message body
Click on the Options
tab, then click on Use
Voting Buttons in
the Tracking group to
display the voting button
options
Select Yes;No and then
send the message
The Yes;No voting
option will allow the
recipients to reply either
with a positive response,
by voting Yes, or with a
negative response, by
voting No
For Your Reference…
To send a voting message:
1. Compose the message
2. Click on Use Voting Buttons in the
Tracking group on the Options tab
3. Select the desired option
4. Send the message
Handy to Know…
Outlook offers three sets of voting button
options plus the ability to create your own
custom voting button names. For example,
you might create the custom voting buttons
Monday;Tuesday;Wednesday to find out
which of the three days best suits your
colleagues for weekly staff meetings.
1
2
Messages are sometimes sent to solicit some
sort of answer or response. For example, you
might send a message asking whether or not
your colleagues can attend a function. Outlook
allows you to add voting buttons to a message.
When the recipient receives the message they can
simply click on the desired voting button and a
reply will be automatically generated.

Microsoft Outlook 2010 - Level 2
© Watsonia Publishing Page 79 Email Techniques
RESPONDING TO A VOTING MESSAGE
Try This Yourself:
Same
File
Continue using the
previous file with this
exercise, or open the file
Watsonia_11.pst...
Click on Inbox to see
the voting message
Notice that the
information ‘Click here
to vote’ appears in the
InfoBar in the message
header in the Reading
pane...
Click on the text Click
here to vote to display
the voting buttons
Click on Vote: Yes
A dialog box listing the
two response options
will display...
Ensure that Send the
response now is
selected, then click on
[OK]
The InfoBar will indicate
that you have
responded to this voting
message
For Your Reference…
To respond to a voting message:
1. Click on the InfoBar in the Reading pane
2. Select the desired voting option
3. Select Send the response now or Edit the
response before sending
4. Click on [OK]
Handy to Know…
As well as responding to a voting message
by simply selecting the desired voting option,
you can include a note for the sender along
with your vote in the response message. To
do this, select the voting option, click on Edit
the response before sending, click on
[OK], and then type and send the message.
1
2
When someone sends you a message with
voting buttons you are presented with several
buttons to indicate how you wish to respond to
the request from the sender. Outlook lets you
respond to it directly using the voting buttons in the
InfoBar in the Reading pane or you can open the
message and select the desired option on the Vote
tool in the ribbon.
3
4
Microsoft Outlook 2010 - Level 2
© Watsonia Publishing Page 80 Email Techniques
TRACKING VOTING RESPONSES
Try This Yourself:
Same
File
Continue using the
previous file with this
exercise...
Click on Inbox – you
should have received a
message with the subject
Yes: Annual Leave
Looking at messages in
the Inbox to check the
recipients’ responses is
fine if you’d only sent the
message to a few people.
But if you sent it to more,
it is easier to see a
summary of the
responses using the
Tracking feature…
Click on Sent Items and
then double-click on the
Annual Leave message
to open it in a message
window
The message should
appear in Sent Items with
the symbol
indicating
that the Tracking feature
has been enabled
...
Click on Tracking in
the Show group to display
a summary of the
responses to your vote
Press to close the
message
For Your Reference…
To review the voting responses:
1. Click on Sent Items
2. Double-click on the original voting message
3. Click on Tracking in the Show group
Handy to Know…
You can export poll responses to Excel. To
do this, open the original message with the
voting buttons and click on Tracking in
the Show group. Select the desired rows,
press + , open Excel, click in a cell
and press + to paste the data.
2
3
As soon as one recipient has responded to your
voting message, Outlook will automatically
tabulate the results. To see the results you simply
open the original message you sent with the
voting buttons – this message is usually found in
the Sent Items folder – and then turn on the
Tracking feature. If desired, you can also export
the poll results to Excel for further manipulation.
Tip: You can set Outlook to automatically delete all blank responses –
that is, messages that contain no comments from the sender other than
their vote. To do this click on the File tab, click on [Options] and then
click on Mail. Tick Update tracking information, and then delete
responses that don’t contain comments under Tracking.
Microsoft Outlook 2010 - Level 2
© Watsonia Publishing Page 81 Email Techniques
SENDING AUTOMATIC RESPONSES
Try This Yourself:
Continue using the previous
file with this exercise...
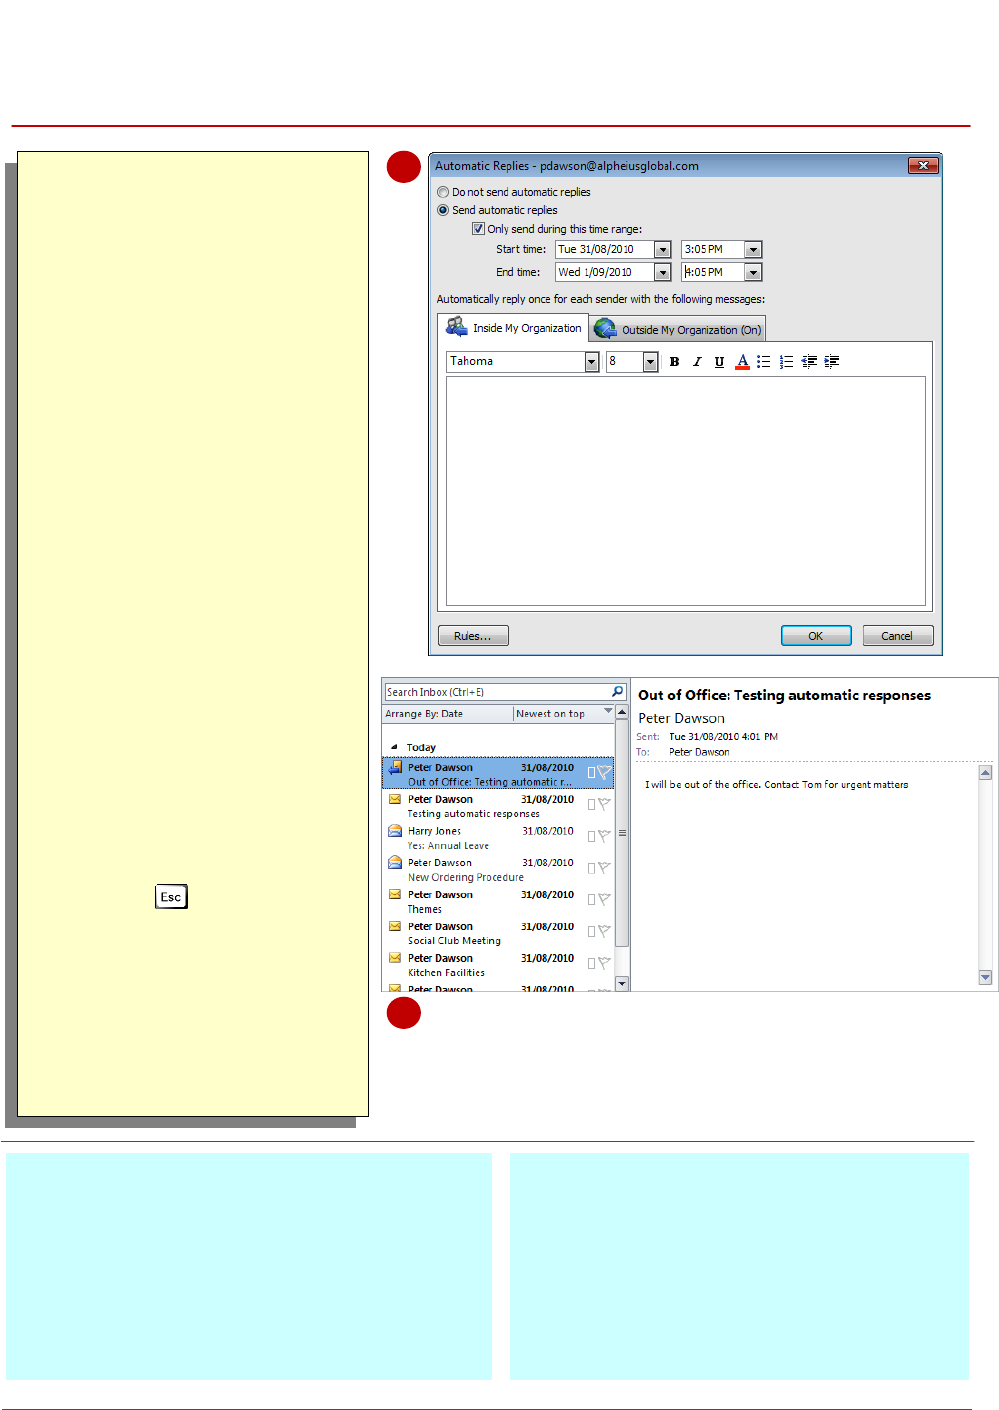
Click on the File tab, then
click on [Automatic
Replies] to open the
Automatic Replies dialog
box
Click on Send automatic
replies
Tick Only send during this
time range and select a
period of one hour from now
Type in the message body I
will be out of the office.
Contact Tom for urgent
matters
Click on the Outside My
Organisation tab, then
select Auto-reply to people
outside my organisation
and Anyone outside my
organisation
Type I am out of the office
in the text box, and then
click on [OK]
Press then create and
send a message to yourself
Click in the Inbox to see the
automatic response
Click on [Turn Off] in the
orange Infobar to turn off
Automatic replies
For Your Reference…
To set up an automatic response message:
1. Click on the File tab, then click on
[Automatic Replies]
2. Click on Send automatic replies and
specify a timeframe
3. Type the text for internal and external
messages
Handy to Know…
You must have a Microsoft Exchange Server
account for automatic replies to work.
Outlook will respond only once for each
sender.
3
8
You can set up Outlook to automatically respond
to people who send you messages. This is ideal
when you are out of your office for some time,
such as being away on annual leave. Using the
Automatic Reply feature you could inform people
the dates of when you’re away, provide an
alternative contact or simply suggest that there may
be a delay before you respond. It’s your choice.
Microsoft Outlook 2010 - Level 2
© Watsonia Publishing Page 82 Email Techniques
NOTES:
1
4
