Updated 01.22.2021 ISD Service Desk 714.509.4457 1 of 10
Microsoft Resources
Outlook
Outlook – Change fonts
Change text color as you compose an email message
When you write an email message, you can change the color of text for a character, word, or any text you select.
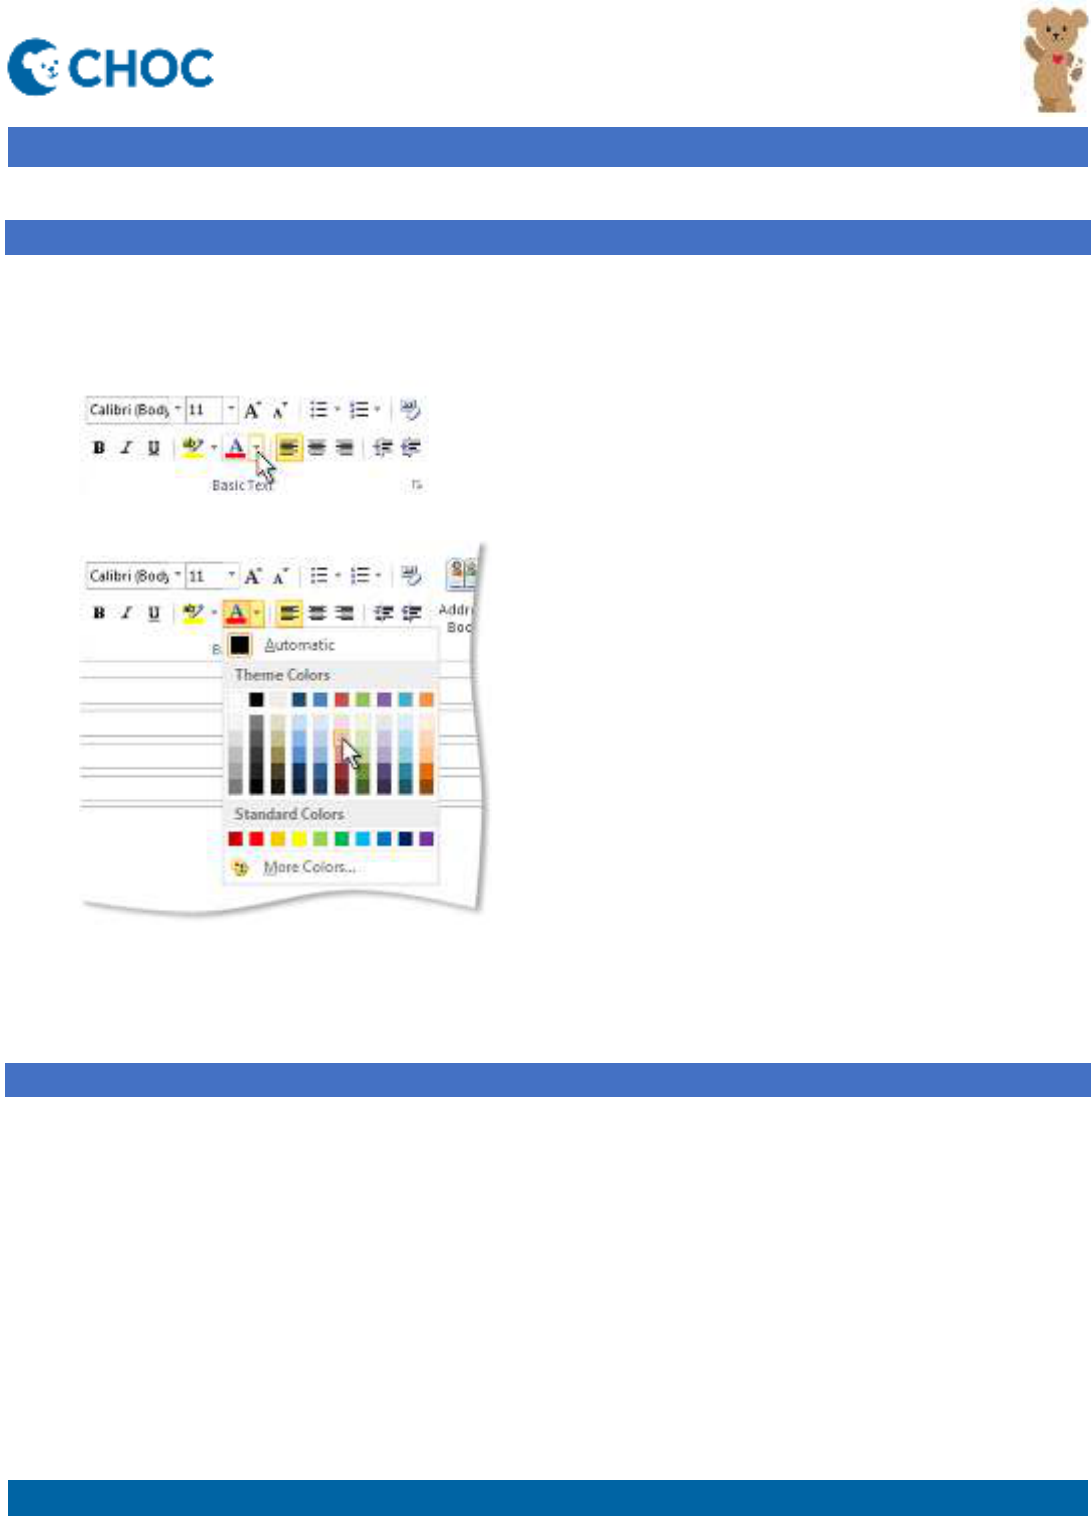
1. Select the text that you want to change.
2. On the
Message
tab, in the
Basic Text
group, choose the arrow next to
Font Color
.
3. On the color palette, choose the color that you want.
If you don’t see the color you want, choose
More Colors
, and then select a color on the
Standard
tab, or mix your own
color on the
Custom
tab.
Note:
You can also switch the message format to something other than plain text to change the text color.
Change the default font or text color for email messages
In Outlook, the default font is 11-point Calibri in black. It's used when you compose new email messages. You can change
the default font and its color, size, and style — such as bold or italic.
Outlook allows you to change the font, color, size, and style for new messages and replies and forwards independently.
Change the default font, color, style, and size for messages
1. On the
File
tab, choose
Options
>
Mail
.
Updated 01.22.2021 ISD Service Desk 714.509.4457 2 of 10
Microsoft Resources
Outlook
Outlook – Change fonts
2. Under
Compose messages
, choose
Stationery and Fonts
.
3. On the
Personal Stationery
tab, under
New mail messages
or
Replying or forwarding messages
,
choose
Font
.
4. In the
Font
box, choose the font, style, size, and color that you want to use. You can see a preview of your
changes as you make them.
5. Choose
OK
three times to return to Outlook.
Your new settings will take effect immediately.
Notes:
You have to set your font preferences independently for both new messages and replies and forwards.
If the font that you choose isn't installed on the recipient's computer, then the recipient's mail program substitutes
an available font.
Restore the initial default font style options
If you later decide you don't want to keep your custom font settings and want to return to the default settings, you can use
the above steps, but choose the following values.
Font
:
+Body
Font style
:
Regular
Size
:
11
Font color
:
Automatic
Change the font size for reading messages
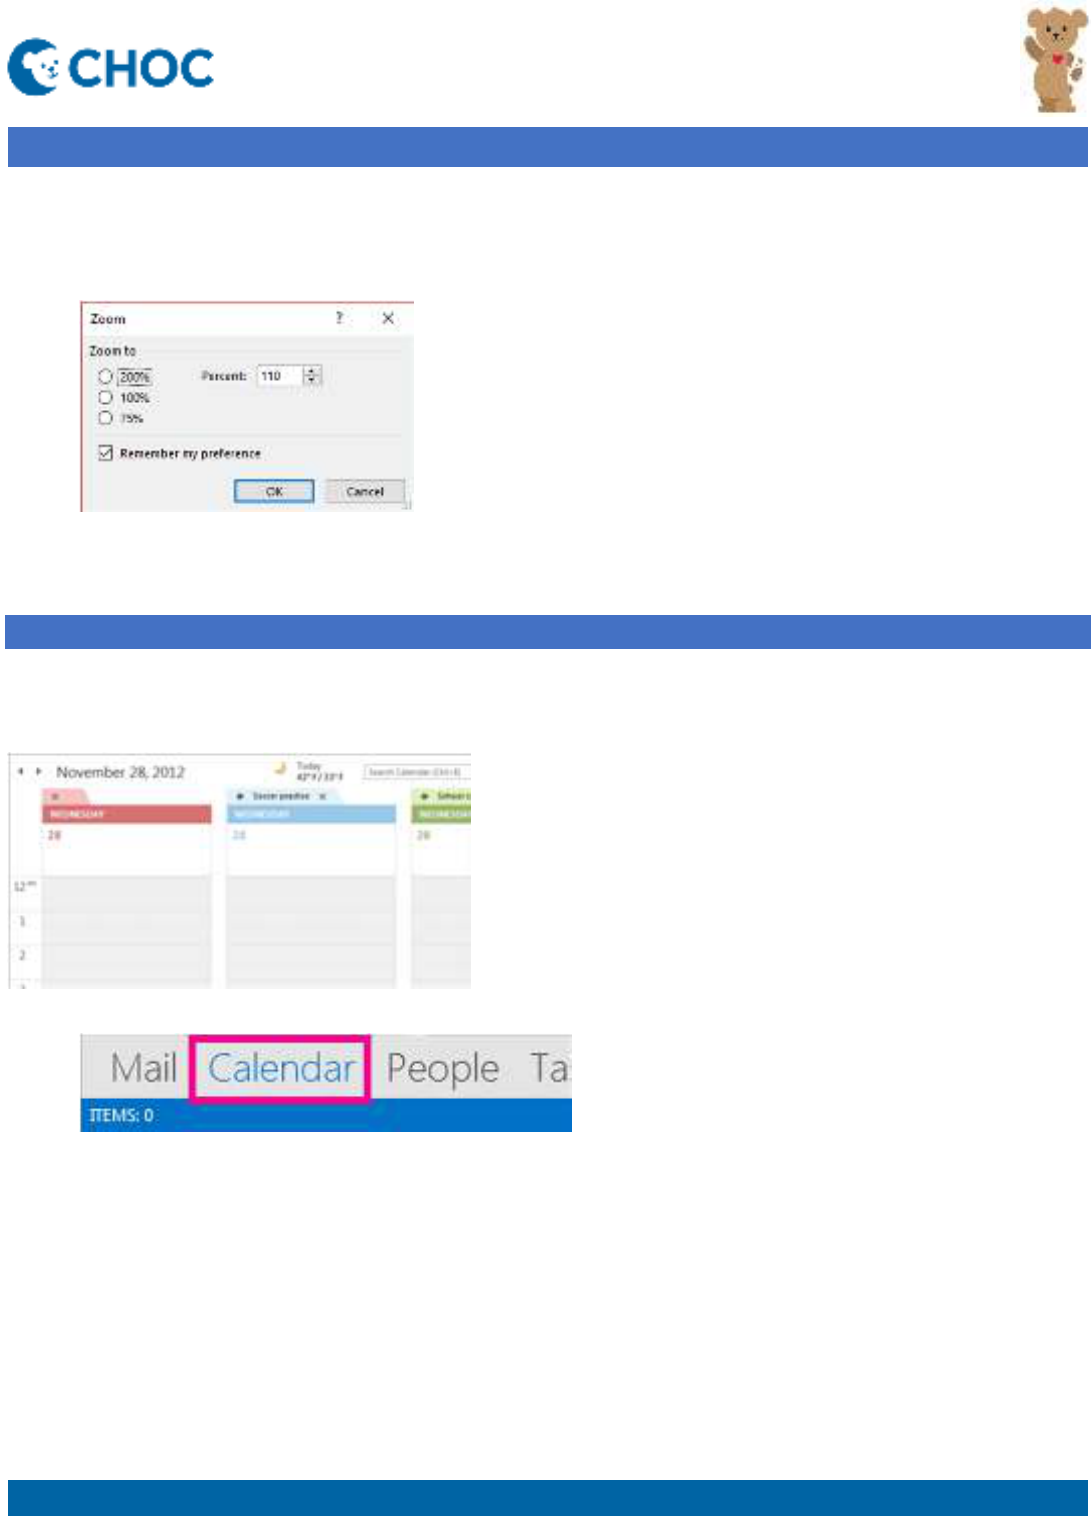
You can change the size of messages in the Reading pane by using the Zoom feature.
To change the zoom level for a single message
Use the slider at the bottom right of the Reading pane to adjust your zoom level. As you adjust, the text size in the
Reading Pane will increase or decrease.
Updated 01.22.2021 ISD Service Desk 714.509.4457 3 of 10
Microsoft Resources
Outlook
Outlook – Change fonts
To change the zoom level on all received messages
1. You can now change the zoom level on all received messages. Click the percentage to the right of the Zoom
slider to open the
Zoom
window.
2. Select one of the default options or enter a specific percentage number.
3. To apply this zoom level to all messages, check the
Remember my preference
check box and then click
OK
.
Change the background color of your calendar
Changing the background color is a quick way to make a calendar distinct. That’s particularly useful when you’re working
with multiple calendars.
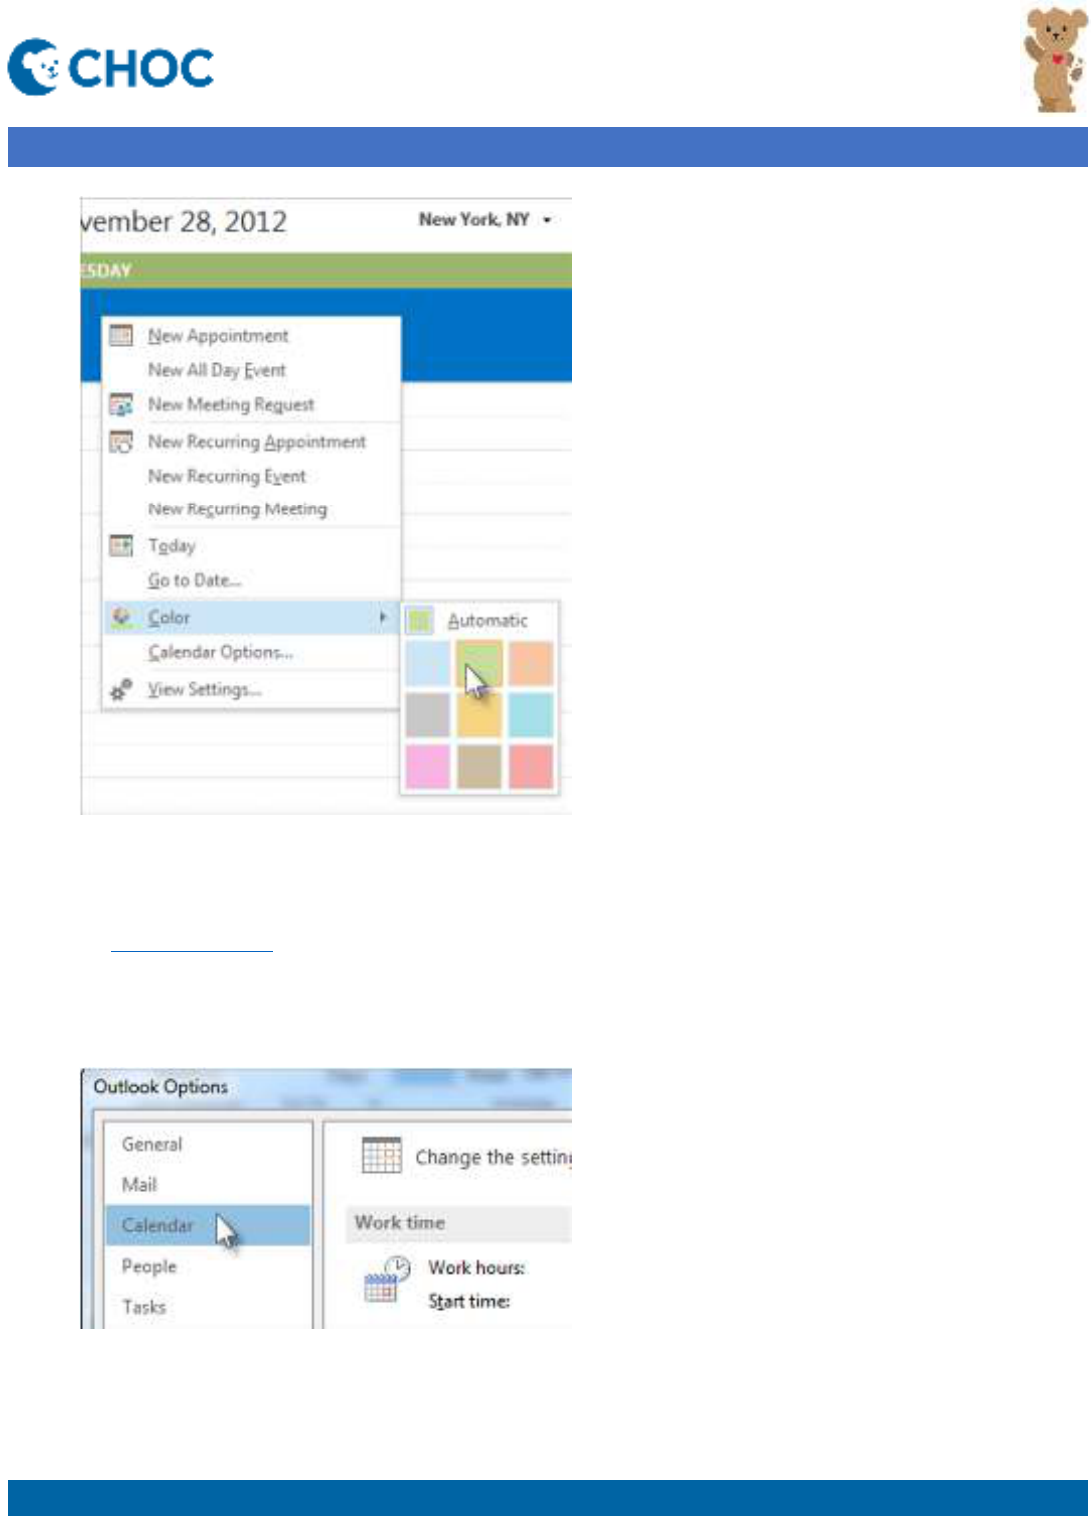
1. Click
Calendar
.
2. Right-click anywhere on your calendar, point to
Color
, and then pick the background color you want.
Updated 01.22.2021 ISD Service Desk 714.509.4457 4 of 10
Microsoft Resources
Outlook
Outlook – Change fonts
3. If you have multiple calendars in your view, right-click each one and pick a different color.
Change the background color for all calendars
If you have multiple calendars and you want them all to have the same background color, you can quickly set the color
from the
File
tab.
1. Click
File
>
Options
.
2. Click
Calendar
.
Updated 01.22.2021 ISD Service Desk 714.509.4457 5 of 10
Microsoft Resources
Outlook
Outlook – Change fonts
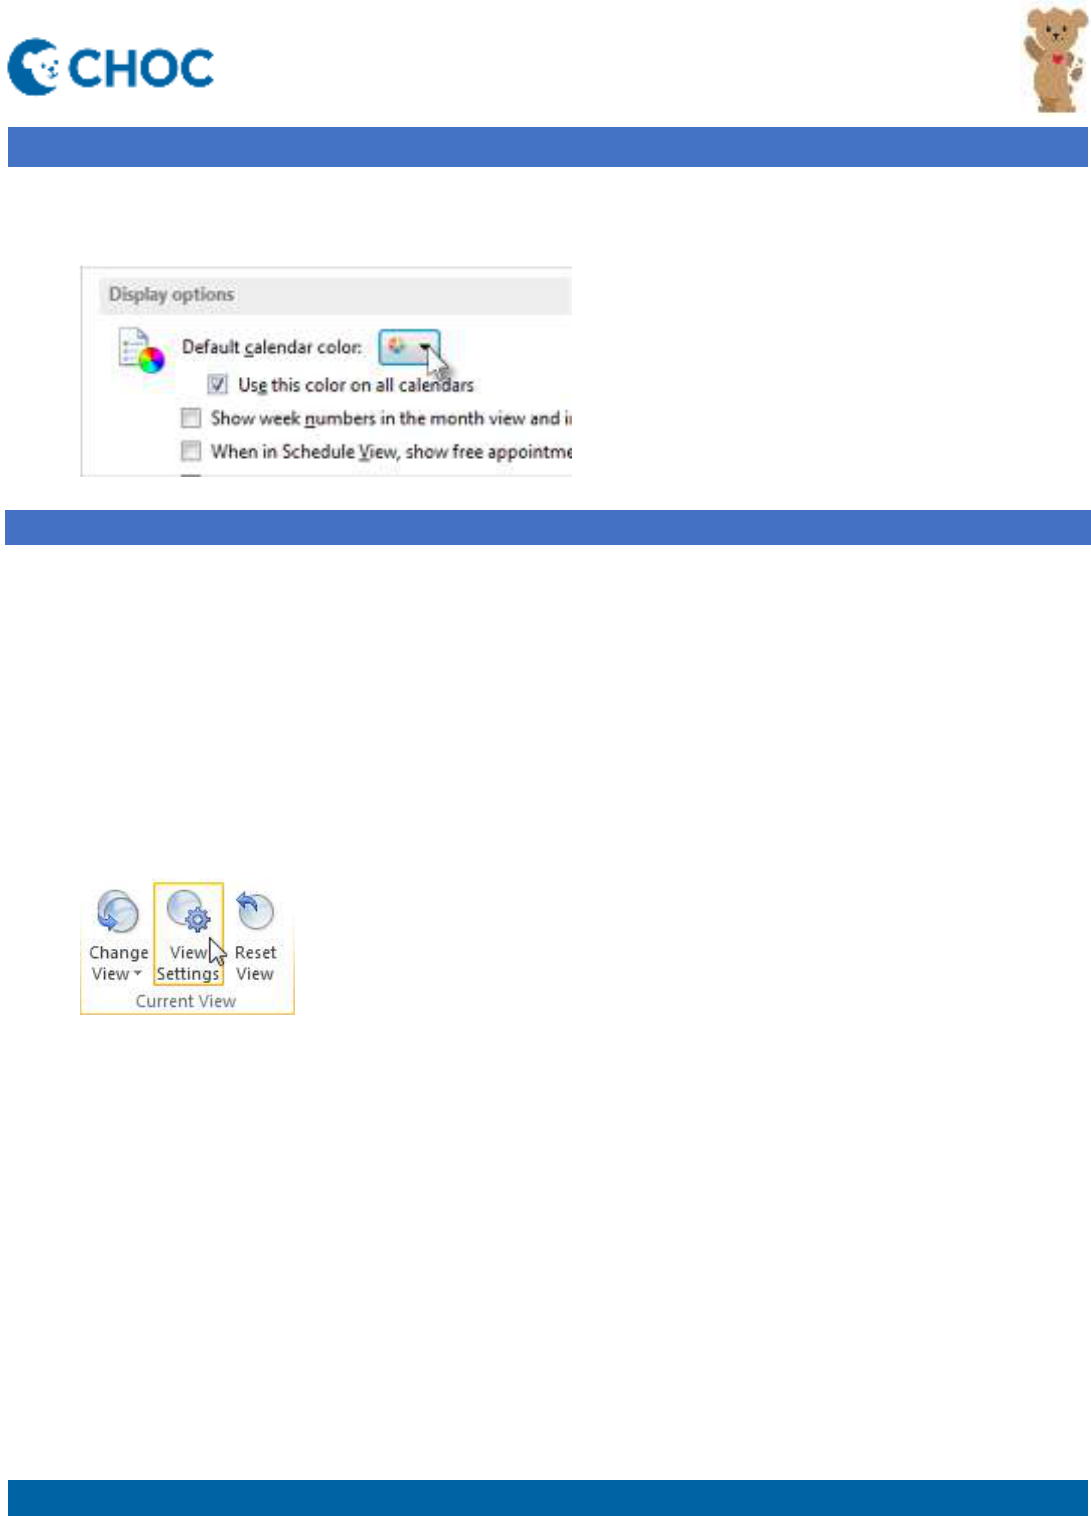
3. Under
Display options
, click the arrow to the right of
Default calendar color
, pick the color you want, and then
check the
Use this color on all calendars
box.
Automatically change incoming message colors and fonts based on sender, subject, or recipients
Conditional formatting is a way to make the incoming messages that meet defined conditions stand out in the message list
by using color, fonts, and styles. You specify conditions that an incoming message should meet, such as a sender’s name
or email address, and then conditional formatting is applied only to those messages.
For example, a conditional rule can specify that all messages sent from your manager appear in red text in the message
list. If you want to make further changes to the body of your email messages, change the default font or text color for
email messages.
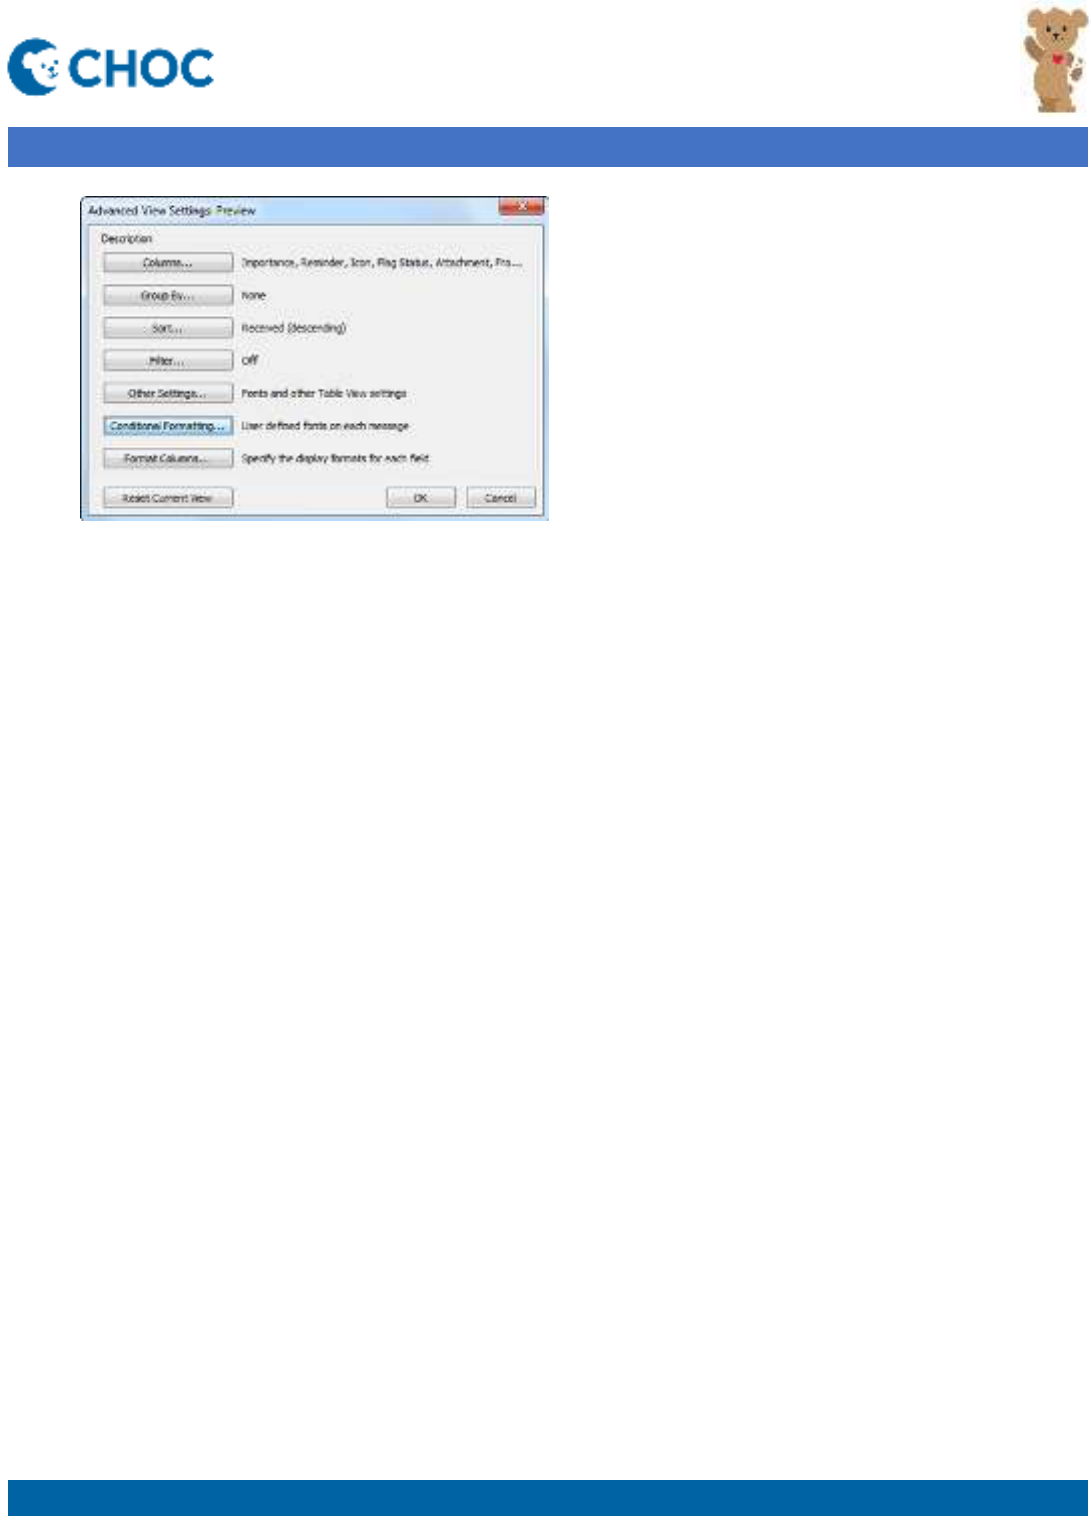
Create a conditional formatting rule
1. In Mail, click
View
.
2. In the
Current View
group, click
View Settings
.
3. In the
Advanced View Settings
dialog box, click
Conditional Formatting
.
Updated 01.22.2021 ISD Service Desk 714.509.4457 6 of 10
Microsoft Resources
Outlook
Outlook – Change fonts
A set of default rules appears. This includes the
Unread messages
rule. This rule makes unread messages appear bold
in the message list. In addition, any conditional formatting rules that you created in the
Organize
pane with an earlier
version of Outlook appear.
1. Do any of the following:
To delete a rule, click the rule, and then click
Delete
.
To temporarily turn off a rule, clear the check box for that rule.
To change the criteria for a rule, click the rule, and then click
Condition
.
To change the text formatting, click the rule, and then click
Font
.
To add a new conditional formatting rule, click
Add
, in the
Name
box, type a name, click
Font
to specify
the formatting, and then click
Condition
to specify the criteria for this rule.
Example conditional formatting rules
These are some examples of conditional formatting rules that you can create in Outlook 2013.
Make all messages from John Kane appear in red
1. Click
Add
.
2. Enter a name for the rule.
3. Click
Font
.
4. Under
Color
, click
Red
.
5. Click
OK
.
6. Click
Condition
.
7. In the
From
box, type John Kane.
Note:
The name must exactly match the full name that appears on messages that you receive.
8. In the
Filter
,
Conditional Formatting
, and
Advanced View Settings
dialog boxes, click
OK
.
Updated 01.22.2021 ISD Service Desk 714.509.4457 7 of 10
Microsoft Resources
Outlook
Outlook – Change fonts
Make all messages that contain the word Contoso in the subject appear green
1. Click
Add
.
2. Enter a name for the rule.
3. Click
Font
.
4. Under
Color
, click
Green
.
5. Click
OK
.
6. Click
Condition
.
7. In the
Search for the word(s)
box, type Contoso.
8. In the
Filter
,
Conditional Formatting
, and
Advanced View Settings
dialog boxes, click
OK
.
Make all messages that contain the word holiday in the subject or message body appear blue
1. Click
Add
.
2. Enter a name for the rule.
3. Click
Font
.
4. Under
Color
, click
Blue
.
5. Click
OK
.
6. Click
Condition
.
7. In the
Search for the word(s)
box, type holiday.
8. In the
Filter
,
Conditional Formatting
, and
Advanced View Settings
dialog boxes, click
OK
.
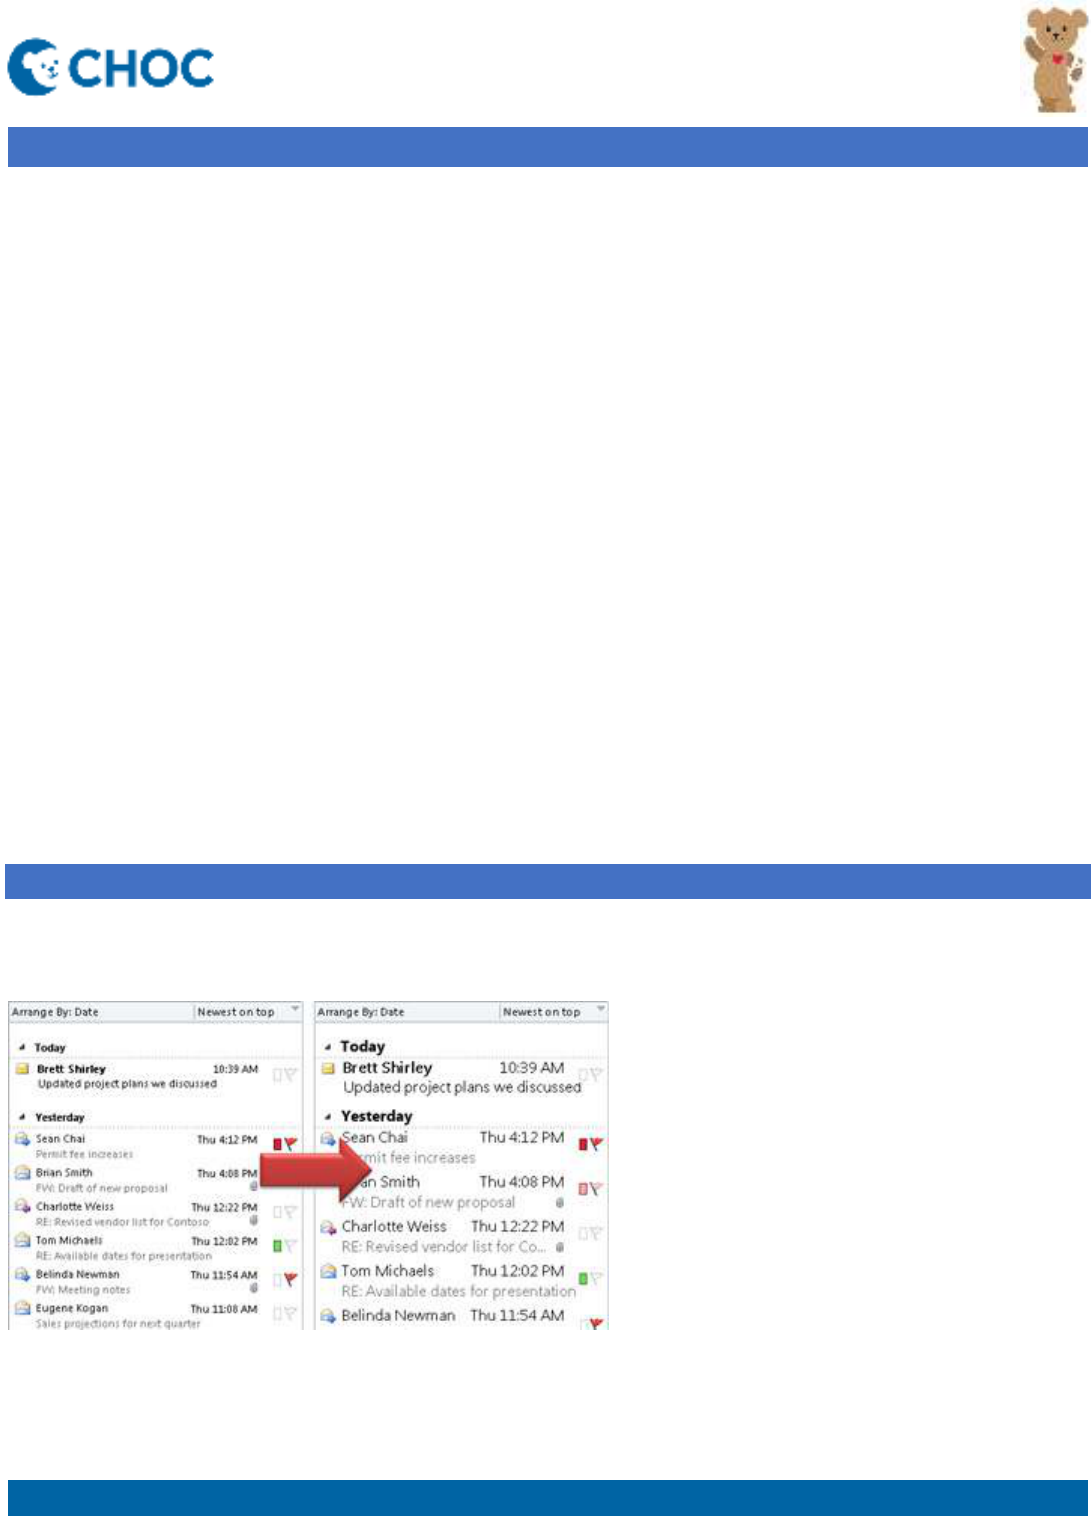
Change the font or font size in the message list
To scan through your Inbox more quickly, you may want to enlarge the text in the subject lines and column header, or
change their font so they’re easier to read.

Updated 01.22.2021 ISD Service Desk 714.509.4457 8 of 10
Microsoft Resources
Outlook
Outlook – Change fonts
1. Click
Mail
.
2. Click
View
>
View Settings
.
3. Click
Other Settings
.
4. To change the font or font size for the column headers in your Inbox (like “From” and “Subject”), click
Column
Font
, and then make the desired adjustment.
5. To change the font or font size of the message subject lines in your Inbox, click
Row Font
, and then make the
desired adjustment.
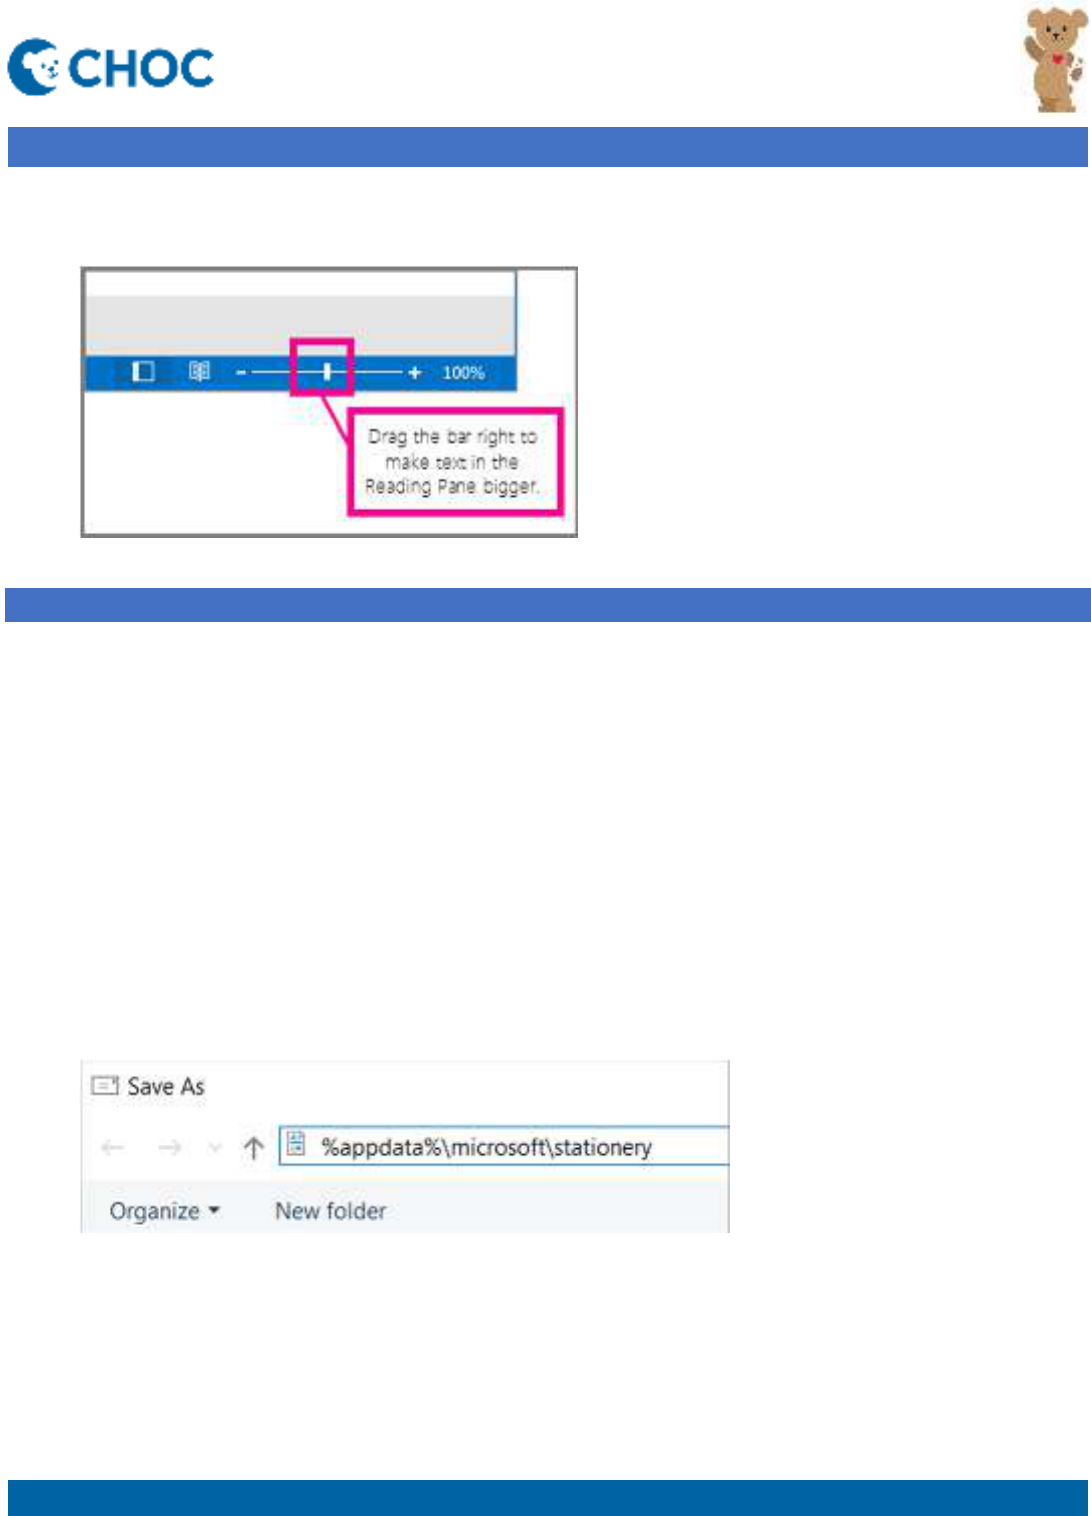
Temporarily enlarge an email in the Reading Pane
In the Reading Pane, you can also make the contents of an email larger, so it’s easier to read.
However, increasing the size of the text in the Reading Pane only works on the email you are currently looking at. When
you click on another email, the body text will return to the default font size.
Updated 01.22.2021 ISD Service Desk 714.509.4457 9 of 10
Microsoft Resources
Outlook
Outlook – Change fonts
1. Click once on the message you want to preview in the Reading Pane.
2. In the bottom right corner of the Outlook window, drag the zoom bar right (for larger text).
Create stationery for email messages
Create stationery for email messages
Stationery and themes are a set of unified design elements and color schemes. They specify fonts, bullets, background
color, horizontal lines, images, and other design elements that you want to include in outgoing email messages.
Outlook includes a large selection of stationery. You can also design your own custom stationery. For example, you can
include a company logo or design that matches your organization’s style guidelines.
1. Create a message.
The message can be discarded after these steps are completed.
2. Customize the message by using fonts, bullets, a background color, horizontal lines, images, and other design
elements that you want to include.
3. In the message window, click the
File
tab.
4. Click
Save As
.
5. In the
Save As
dialog box address bar, enter
%appdata%\microsoft\stationery
, and then press Enter
The
Stationery
folder opens.
6. In the
File name
box, enter a name for your new stationery.
7. In the
Save as type
list, click
HTML
.
Updated 01.22.2021 ISD Service Desk 714.509.4457 10 of 10
Microsoft Resources
Outlook
Outlook – Change fonts
8. Click
Save
.
The stationery is now ready to be applied to new email messages.
Apply stationery or backgrounds to email messages
Apply Outlook stationery and themes to all messages
1. Click the
File
tab.
2. Click
Options
.
3. Click
Mail
.
4. Click
Stationery and Fonts
.
5. On the
Personal Stationery
tab, click
Theme
.
Note:
If you try this procedure without HTML as your message format, the message
Themes are not
installed
appears.
6. Under
Choose a theme
, click the theme or stationery that you want, and then click
OK
.
7. Select the font options that you want to use.
How do I change the format of all my new messages to HTML?
1. Click the
File
tab.
2. Click
Options
.
3. Click
Mail
.
4. Under
Compose messages
, in the
Compose messages in this message format
list, click
HTML
.
Apply Outlook stationery and themes to a single message
1. Click the
Home
tab.
2. In the
New
group, click
New Items
, point to
Email Message Using
, and then click
More Stationery
.
3. Under
Choose a Theme
, click the theme or stationery that you want, and then click
OK
.
4. Compose and send your message.
Turn off Outlook stationery and themes
1. Click the
File
tab.
2. Click
Options
.
3. Click
Mail
.
4. Under
Compose messages
, click
Stationery and Fonts
.
5. On the
Personal Stationery
tab, click
Theme
.
6. Under
Choose a Theme
, click
(No Theme)
.
For more information, please refer to the Microsoft training resource page HERE
